Sign-In with Ethereum
Sign-In with Ethereum is a new form of authentication that enables users to control their digital identity with their Ethereum account and ENS profile instead of relying on a traditional intermediary. Already used throughout Web3, this effort standardizes the method with best practices and makes it easy to adopt securely.
To hop right in, check out our Quickstart Guide.
Integrate Sign-In with Ethereum
Additional Support
Additional Resources
-
Sign-in With Ethereum was a standard built collaboratively with the greater Ethereum community. For more information on the EIP, check out the following page: EIP-4361
-
For more information on Sign-In with Ethereum and its related benefits to both the Web3 ecosystem and Web2 services, check out the following page: SIWE Overview
Community
- 💻 Login.xyz - Check out the Sign-In with Ethereum home page for more information about supporters, and recent activity.
- 👾 Discord - Join the #sign-in-with-ethereum channel in the Spruce Discord Server for additional support.
- 📖 Blog - Check out the latest updates on Sign-In with Ethereum posted on the Spruce blog.
We host a Sign-In with Ethereum community where we discuss relevant updates, new libraries, additional integrations, and more. If you’re interested in contributing to Sign-In with Ethereum, we encourage that you join the calls by filling in this form.
⭐ Quickstart Guide
⚡ Requirements
- Node.js
- MetaMask browser extension wallet
- An Ethereum account in the installed MetaMask wallet
The repository for this tutorial can be found here:
📝 Creating SIWE Messages
A completed version of this part can be found in the example repository (00_print).
Creating SIWE messages in JavaScript is straightforward when using the siwe library in npm. To begin, create a new project called siwe-print.
mkdir siwe-print && cd siwe-print/
yarn init --yes
yarn add siwe ethers
mkdir src/
We can then write the following into ./src/index.js:
src/index.js
const siwe = require('siwe');

const domain = "localhost";
const origin = "https://localhost/login";

function createSiweMessage (address, statement) {
  const siweMessage = new siwe.SiweMessage({
    domain,
    address,
    statement,
    uri: origin,
    version: '1',
    chainId: '1'
  });
  return siweMessage.prepareMessage();
}

console.log(createSiweMessage(
    "0x6Ee9894c677EFa1c56392e5E7533DE76004C8D94",
    "This is a test statement."
  ));
Now run the example:
node src/index.js
You should see output similar to the following message, with different values for the Nonce and Issued At fields:
localhost wants you to sign in with your Ethereum account:
0x6Ee9894c677EFa1c56392e5E7533DE76004C8D94

This is a test statement.

URI: https://localhost/login
Version: 1
Chain ID: 1
Nonce: oNCEHm5jzQU2WvuBB
Issued At: 2022-01-28T23:28:16.013Z
To learn about all the available fields in a SiweMessage, check out the information in EIP-4361
The fields we are most interested in for the purposes of this guide are address and statement. address is the Ethereum address which the user is signing in with, and the statement as this will describe to the user what action we wish to perform on their behalf.
Often, as in this example, we don’t need to do any manipulation of the message, so we can immediately convert it into the textual representation that the user will sign.
🖥️ Implement the Frontend
A completed version of this part can be found in the example repository (01_frontend). This example uses the browser console to print messages, so it should be actively monitored.
To sign in with Ethereum we only need to send two pieces of information:
- The message
- The signature of the message
On the previous page, we wrote a function that gives us the means to create messages, so now we only need the means to sign messages.
So we must first connect the web application and the user’s wallet so that the application can request information about the Ethereum account and sign messages.
1. In order to do that we will need to add some new dependencies to our print project:
mkdir siwe-frontend && cd siwe-frontend/
yarn init --yes
mkdir src/
yarn add siwe                   \
         ethers                 \
         webpack-node-externals \
         node-polyfill-webpack-plugin

yarn add -D html-webpack-plugin \
            webpack             \
            webpack-cli         \
            webpack-dev-server  \
            bufferutil          \
            utf-8-validate
2. Create a new file webpack.config.js and add the following:
const path = require('path');
const HtmlWebpackPlugin = require('html-webpack-plugin');
const NodePolyfillPlugin = require("node-polyfill-webpack-plugin")

module.exports = {
  mode: 'development',
  entry: './src/index.js',
  resolve: {
    fallback: {
      net: false,
      tls: false,
      fs: false,
    }
  },
  output: {
    filename: 'main.js',
    path: path.resolve(__dirname, 'dist')
  },
  plugins: [
    new HtmlWebpackPlugin({
      template: './src/index.html',
      filename: 'index.html'
    }),
    new NodePolyfillPlugin(),
  ]
};
3. Make sure that package.json has the scripts section and match it to the following:
{
  "name": "siwe-frontend",
  "version": "1.0.0",
  "main": "index.js",
  "license": "MIT",
  "scripts": {
    "start": "webpack serve"
  },
  "dependencies": {
    "siwe": "^2.1.4",
    "ethers": "^6.3.0",
    "node-polyfill-webpack-plugin": "^2.0.1",
    "webpack-node-externals": "^3.0.0"
  },
  "devDependencies": {
    "bufferutil": "^4.0.7",
    "html-webpack-plugin": "^5.5.1",
    "utf-8-validate": "^6.0.3",
    "webpack": "^5.80.0",
    "webpack-cli": "^5.0.1",
    "webpack-dev-server": "^4.13.3"
  }
}
4. Populate src/index.js with the following:
src/index.js
import { BrowserProvider } from 'ethers';
import { SiweMessage } from 'siwe';

const domain = window.location.host;
const origin = window.location.origin;
const provider = new BrowserProvider(window.ethereum);

function createSiweMessage (address, statement) {
  const message = new SiweMessage({
    domain,
    address,
    statement,
    uri: origin,
    version: '1',
    chainId: '1'
  });
  return message.prepareMessage();
}

function connectWallet () {
  provider.send('eth_requestAccounts', [])
    .catch(() => console.log('user rejected request'));
}

async function signInWithEthereum () {
  const signer = await provider.getSigner();
  const message = createSiweMessage(
      signer.address,
      'Sign in with Ethereum to the app.'
    );
  console.log(await signer.signMessage(message));
}

// Buttons from the HTML page
const connectWalletBtn = document.getElementById('connectWalletBtn');
const siweBtn = document.getElementById('siweBtn');
connectWalletBtn.onclick = connectWallet;
siweBtn.onclick = signInWithEthereum;
5. Populate src/index.html with the following:
src/index.html
<!DOCTYPE html>
<html>
<head>
  <meta charset="utf-8" />
  <title>SIWE Quickstart</title>
</head>

<body>
  <div><button id='connectWalletBtn'>Connect wallet</button></div>
  <div><button id='siweBtn'>Sign-in with Ethereum</button></div>
</body>
</html>
6. Now run the following command and visit the URL printed to the console. After you connect your wallet and sign the message, the signature should appear in the console.
yarn start
Explanation of Components
- ethers.js is a library that provides functionality for interacting with the Ethereum blockchain. We use it here for connecting the webpage to extension wallets.
- The Metamask extension injects the
window.ethereumobject into every webpage, and theetherslibrary provides a convenient provider class to wrap it. We then use this provider to connect to the wallet, and access signing capabilities:
const provider = new BrowserProvider(window.ethereum);
const signer = await provider.getSigner();
- Running the
connectWalletfunction below will send a request to the MetaMask extension to ask permission to view information about the Ethereum accounts that it controls. MetaMask will then show a window to the user asking them to authorize our application to do so. If they authorize the request then we’ve connected their account:
function connectWallet () {
  provider.send('eth_requestAccounts', [])
    .catch(() => console.log('user rejected request'));
}
- We can also now start signing requests with the following:
await signer.signMessage(message);
To disconnect an account, the user must do so from the MetaMask extension in this example.
⚙️ Implement the Backend
A completed version of this part can be found here (02_backend). This example uses only uses the command line in the terminal to print messages, no monitoring of the browser console log is necessary.
The backend server gives the frontend a nonce to include in the SIWE message and also verifies the submission. As such, this basic example only provides two corresponding endpoints:
/nonceto generate the nonce for the interaction viaGETrequest./verifyto verify the submitted SIWE message and signature viaPOSTrequest.
While this simple example does not check the nonce during verification, all production implementations should, as demonstrated in the final section Using Sessions.
1. Setup the project directory:
mkdir siwe-backend && cd siwe-backend/
yarn init --yes
mkdir src/
yarn add cors express siwe ethers
2. Make sure that the package.json type is module like the following:
{
  "name": "backend",
  "version": "1.0.0",
  "main": "index.js",
  "type": "module",
  "license": "MIT",
  "scripts": {
    "start": "node src/index.js"
  },
  "dependencies": {
    "siwe": "^2.1.4",
    "cors": "^2.8.5",
    "ethers": "^6.3.0",
    "express": "^4.18.2"
  }
}
3. Populate src/index.js with the following:
src/index.js
import cors from 'cors';
import express from 'express';
import { generateNonce, SiweMessage } from 'siwe';

const app = express();
app.use(express.json());
app.use(cors());

app.get('/nonce', function (_, res) {
    res.setHeader('Content-Type', 'text/plain');
    res.send(generateNonce());
});

app.post('/verify', async function (req, res) {
    const { message, signature } = req.body;
    const siweMessage = new SiweMessage(message);
    try {
        await siweMessage.verify({ signature });
        res.send(true);
    } catch {
        res.send(false);
    }
});

app.listen(3000);
4. You can run the server with the following command.
yarn start
In a new terminal window, test the /nonce endpoint to make sure the backend is working:
curl 'http://localhost:3000/nonce'
In the same new terminal window, test the /verify endpoint use the following, and ensure the response is true:
curl 'http://localhost:3000/verify' \
  -H 'Content-Type: application/json' \
  --data-raw '{"message":"localhost:8080 wants you to sign in with your Ethereum account:\n0x9D85ca56217D2bb651b00f15e694EB7E713637D4\n\nSign in with Ethereum to the app.\n\nURI: http://localhost:8080\nVersion: 1\nChain ID: 1\nNonce: spAsCWHwxsQzLcMzi\nIssued At: 2022-01-29T03:22:26.716Z","signature":"0xe117ad63b517e7b6823e472bf42691c28a4663801c6ad37f7249a1fe56aa54b35bfce93b1e9fa82da7d55bbf0d75ca497843b0702b9dfb7ca9d9c6edb25574c51c"}'
Note on Verifying Messages
We can verify the received SIWE message by parsing it back into a SiweMessage object (the constructor handles this), assigning the received signature to it and calling the verify method:
message.verify({ signature })
message.verify({ signature }) in the above snippet makes sure that the given signature is correct for the message, ensuring that the Ethereum address within the message produced the matching signature.
In other applications, you may wish to do further verification on other fields in the message, for example asserting that the authority matches the expected domain, or checking that the named address has the authority to access the named URI.
A small example of this is shown later where the nonce attribute is used to track that a given address has signed the message given by the server.
🔗 Connect the Frontend
A completed version of the updated frontend can be found here (03_complete_app/frontend). This example uses the browser console to print messages, so it should be actively monitored.
1. Revisit the siwe-frontend directory, stop any running servers, and update src/index.js:
src/index.js
import { BrowserProvider } from 'ethers';
import { SiweMessage } from 'siwe';

const domain = window.location.host;
const origin = window.location.origin;
const provider = new BrowserProvider(window.ethereum);

const BACKEND_ADDR = "http://localhost:3000";

async function createSiweMessage(address, statement) {
    const res = await fetch(`${BACKEND_ADDR}/nonce`);
    const message = new SiweMessage({
        domain,
        address,
        statement,
        uri: origin,
        version: '1',
        chainId: '1',
        nonce: await res.text()
    });
    return message.prepareMessage();
}

function connectWallet() {
    provider.send('eth_requestAccounts', [])
        .catch(() => console.log('user rejected request'));
}

let message = null;
let signature = null;

async function signInWithEthereum() {
    const signer = await provider.getSigner();

    message = await createSiweMessage(
        await signer.address,
        'Sign in with Ethereum to the app.'
    );
    console.log(message);
    signature = await signer.signMessage(message);
    console.log(signature);
}

async function sendForVerification() {
    const res = await fetch(`${BACKEND_ADDR}/verify`, {
        method: "POST",
        headers: {
            'Content-Type': 'application/json',
        },
        body: JSON.stringify({ message, signature }),
    });
    console.log(await res.text());
}

const connectWalletBtn = document.getElementById('connectWalletBtn');
const siweBtn = document.getElementById('siweBtn');
const verifyBtn = document.getElementById('verifyBtn');
connectWalletBtn.onclick = connectWallet;
siweBtn.onclick = signInWithEthereum;
verifyBtn.onclick = sendForVerification;
2. Update src/index.html:
src/index.html
<!DOCTYPE html>
<html>
<head>
  <meta charset="utf-8" />
  <title>SIWE Quickstart</title>
</head>

<body>
  <div><button id='connectWalletBtn'>Connect wallet</button></div>
  <div><button id='siweBtn'>Sign-in with Ethereum</button></div>
  <div><button id='verifyBtn'>Send for verification</button></div>
</body>
</html>
3. For this last step, you need to have both the frontend and backend running together. Start by running the backend server with the following command from the parent directory:
cd siwe-backend
yarn start
In a separate terminal, start the frontend by running the following command and visit the URL printed to the console:
cd siwe-frontend
yarn start
4. Try to Sign-In with Ethereum by visiting the URL printed to the console, connecting your wallet, and signing in. You can now hit the Send for verification button to receive a true in the console.
🔐 Implement Sessions
A completed version of the updated backend can be found here (03_complete_app/backend). This example uses the browser console to print messages, so it should be actively monitored.
For additional security against replay attacks, it is not enough for the backend to generate the nonce. It must also be tied to a browser session with the end-user. In the siwe-backend directory, install the following and edit index.js:
yarn add express-session
Update src/index.js to the following:
src/index.js
import cors from 'cors';
import express from 'express';
import Session from 'express-session';
import { generateNonce, SiweMessage } from 'siwe';

const app = express();
app.use(express.json());
app.use(cors({
    origin: 'http://localhost:8080',
    credentials: true,
}))

app.use(Session({
    name: 'siwe-quickstart',
    secret: "siwe-quickstart-secret",
    resave: true,
    saveUninitialized: true,
    cookie: { secure: false, sameSite: true }
}));

app.get('/nonce', async function (req, res) {
    req.session.nonce = generateNonce();
    res.setHeader('Content-Type', 'text/plain');
    res.status(200).send(req.session.nonce);
});

app.post('/verify', async function (req, res) {
    try {
        if (!req.body.message) {
            res.status(422).json({ message: 'Expected prepareMessage object as body.' });
            return;
        }

        let SIWEObject = new SiweMessage(req.body.message);
        const { data: message } = await SIWEObject.verify({ signature: req.body.signature, nonce: req.session.nonce });

        req.session.siwe = message;
        req.session.cookie.expires = new Date(message.expirationTime);
        req.session.save(() => res.status(200).send(true));
    } catch (e) {
        req.session.siwe = null;
        req.session.nonce = null;
        console.error(e);
        switch (e) {
            case ErrorTypes.EXPIRED_MESSAGE: {
                req.session.save(() => res.status(440).json({ message: e.message }));
                break;
            }
            case ErrorTypes.INVALID_SIGNATURE: {
                req.session.save(() => res.status(422).json({ message: e.message }));
                break;
            }
            default: {
                req.session.save(() => res.status(500).json({ message: e.message }));
                break;
            }
        }
    }
});

app.get('/personal_information', function (req, res) {
    if (!req.session.siwe) {
        res.status(401).json({ message: 'You have to first sign_in' });
        return;
    }
    console.log("User is authenticated!");
    res.setHeader('Content-Type', 'text/plain');
    res.send(`You are authenticated and your address is: ${req.session.siwe.address}`);
});

app.listen(3000);
This way, the session (req.session) stores the nonce for the initial validation of the message, and once that’s done, more can be added. For example, here we store the message’s fields, so we can always reference the address of the user.
A potential extension is to resolve the ENS domain of the user and keep it in the session.
Refer to http://expressjs.com/en/resources/middleware/session.html for additional information on how to use express-session in production.
On the client side, the flow is similar to the previous example, except we now need to send cookies with our requests for the session to work. We can add a new endpoint, personal_information, to retrieve the information from the session in place, without having to send the message and signature every time.
In the siwe-frontend directory, stop any running instances and populate src/index.js to match the following:
src/index.js
import { BrowserProvider } from 'ethers';
import { SiweMessage } from 'siwe';

const domain = window.location.host;
const origin = window.location.origin;
const provider = new BrowserProvider(window.ethereum);

const BACKEND_ADDR = "http://localhost:3000";
async function createSiweMessage(address, statement) {
    const res = await fetch(`${BACKEND_ADDR}/nonce`, {
        credentials: 'include',
    });
    const message = new SiweMessage({
        domain,
        address,
        statement,
        uri: origin,
        version: '1',
        chainId: '1',
        nonce: await res.text()
    });
    return message.prepareMessage();
}

function connectWallet() {
    provider.send('eth_requestAccounts', [])
        .catch(() => console.log('user rejected request'));
}

async function signInWithEthereum() {
    const signer = await provider.getSigner();

    const message = await createSiweMessage(
        await signer.getAddress(),
        'Sign in with Ethereum to the app.'
    );
    const signature = await signer.signMessage(message);

    const res = await fetch(`${BACKEND_ADDR}/verify`, {
        method: "POST",
        headers: {
            'Content-Type': 'application/json',
        },
        body: JSON.stringify({ message, signature }),
        credentials: 'include'
    });
    console.log(await res.text());
}

async function getInformation() {
    const res = await fetch(`${BACKEND_ADDR}/personal_information`, {
        credentials: 'include',
    });
    console.log(await res.text());
}

const connectWalletBtn = document.getElementById('connectWalletBtn');
const siweBtn = document.getElementById('siweBtn');
const infoBtn = document.getElementById('infoBtn');
connectWalletBtn.onclick = connectWallet;
siweBtn.onclick = signInWithEthereum;
infoBtn.onclick = getInformation;
Update the siwe-frontend/src/index.html to match the following:
src/index.html
<!DOCTYPE html>
<html>
  <head>
    <meta charset="utf-8" />
    <title>SIWE Quickstart</title>
  </head>

  <body>
    <div><button id="connectWalletBtn">Connect wallet</button></div>
    <div><button id="siweBtn">Sign-in with Ethereum</button></div>
    <div><button id="infoBtn">Get session information</button></div>
  </body>
</html>
3. For this last step, you need to have both the frontend and backend running together. Start by running the backend server with the following command from the parent directory:
cd siwe-backend
yarn start
In a separate terminal, start the frontend by running the following command and visit the URL printed to the console:
cd siwe-frontend
yarn start
4. Try to Sign-In with Ethereum by visiting the URL printed to the console, connecting your wallet, and signing in. You can now hit the Get session information button to receive a message similar to the following in the console:
You are authenticated and your address is:
0x6Ee9894c677EFa1c56392e5E7533DE76004C8D94
🆔 Resolve ENS Profiles
A completed version of the updated frontend can be found here: (04_ens_resolution/frontend).
Now that the application knows the user’s connected account, a basic profile can be built using additional information from ENS if available. Because the frontend is already is using ethers, it is simple to add this functionality and retrieve this data.
Update the frontend/src/index.html file to the following:
src/index.html
<!DOCTYPE html>
<html>

<head>
  <meta charset="utf-8" />
  <title>SIWE Quickstart</title>
  <style>
    .hidden {
      display: none
    }

    table, th, td {
      border: 1px black solid;
    }

    .avatar {
      border-radius: 8px;
      border: 1px solid #ccc;
      width: 20px;
      height: 20px;
    }
  </style>
</head>

<body>
  <div><button id="connectWalletBtn">Connect wallet</button></div>
  <div><button id="siweBtn">Sign-in with Ethereum</button></div>
  <div><button id="infoBtn">Get session information</button></div>
  <div class="hidden" id="welcome">
  </div>
  <div class="hidden" id="profile">
    <h3>ENS Metadata:</h3>
    <div id="ensLoader"></div>
    <div id="ensContainer" class="hidden">
      <table id="ensTable">
      </table>
    </div>
  </div>
  <div class="hidden" id="noProfile">
    No ENS Profile detected.
  </div>
</body>

</html>
This will create a table with data based on the user’s ENS information if it exists. Otherwise, if there isn’t any data, it will remain hidden and a “No ENS Profile detected.” message will be displayed.
Finally, we can finish by updating the index.js file to include what’s needed.
Update the frontend/src/index.js file to the following:
src/index.js
import { BrowserProvider } from 'ethers';
import { SiweMessage } from 'siwe';

const domain = window.location.host;
const origin = window.location.origin;
const provider = new BrowserProvider(window.ethereum);

const profileElm = document.getElementById('profile');
const noProfileElm = document.getElementById('noProfile');
const welcomeElm = document.getElementById('welcome');

const ensLoaderElm = document.getElementById('ensLoader');
const ensContainerElm = document.getElementById('ensContainer');
const ensTableElm = document.getElementById('ensTable');

let address;

const BACKEND_ADDR = "http://localhost:3000";
async function createSiweMessage(address, statement) {
    const res = await fetch(`${BACKEND_ADDR}/nonce`, {
        credentials: 'include',
    });
    const message = new SiweMessage({
        domain,
        address,
        statement,
        uri: origin,
        version: '1',
        chainId: '1',
        nonce: await res.text()
    });
    return message.prepareMessage();
}

function connectWallet() {
    provider.send('eth_requestAccounts', [])
        .catch(() => console.log('user rejected request'));
}

async function signInWithEthereum() {
    const signer = await provider.getSigner();
    profileElm.classList = 'hidden';
    noProfileElm.classList = 'hidden';
    welcomeElm.classList = 'hidden';

    address = await signer.getAddress()
    const message = await createSiweMessage(
        address,
        'Sign in with Ethereum to the app.'
    );
    const signature = await signer.signMessage(message);

    const res = await fetch(`${BACKEND_ADDR}/verify`, {
        method: "POST",
        headers: {
            'Content-Type': 'application/json',
        },
        body: JSON.stringify({ message, signature }),
        credentials: 'include'
    });

    if (!res.ok) {
        console.error(`Failed in getInformation: ${res.statusText}`);
        return
    }
    console.log(await res.text());

    displayENSProfile();
}

async function getInformation() {
    const res = await fetch(`${BACKEND_ADDR}/personal_information`, {
        credentials: 'include',
    });

    if (!res.ok) {
        console.error(`Failed in getInformation: ${res.statusText}`);
        return
    }

    let result = await res.text();
    console.log(result);
    address = result.split(" ")[result.split(" ").length - 1];
    displayENSProfile();
}

async function displayENSProfile() {
    const ensName = await provider.lookupAddress(address);

    if (ensName) {
        profileElm.classList = '';

        welcomeElm.innerHTML = `Hello, ${ensName}`;
        let avatar = await provider.getAvatar(ensName);
        if (avatar) {
            welcomeElm.innerHTML += ` <img class="avatar" src=${avatar}/>`;
        }

        ensLoaderElm.innerHTML = 'Loading...';
        ensTableElm.innerHTML.concat(`<tr><th>ENS Text Key</th><th>Value</th></tr>`);
        const resolver = await provider.getResolver(ensName);

        const keys = ["email", "url", "description", "com.twitter"];
        ensTableElm.innerHTML += `<tr><td>name:</td><td>${ensName}</td></tr>`;
        for (const key of keys)
            ensTableElm.innerHTML += `<tr><td>${key}:</td><td>${await resolver.getText(key)}</td></tr>`;
        ensLoaderElm.innerHTML = '';
        ensContainerElm.classList = '';
    } else {
        welcomeElm.innerHTML = `Hello, ${address}`;
        noProfileElm.classList = '';
    }

    welcomeElm.classList = '';
}

const connectWalletBtn = document.getElementById('connectWalletBtn');
const siweBtn = document.getElementById('siweBtn');
const infoBtn = document.getElementById('infoBtn');
connectWalletBtn.onclick = connectWallet;
siweBtn.onclick = signInWithEthereum;
infoBtn.onclick = getInformation;
The above adds a look-up for some ENS metadata (email, url, description and twitter), then converts the result into content that is displayed in the table. Other functionality includes the showing and hiding of UI elements to make the page dynamic.
By doing this we’re grabbing the label to each of the text records for a user’s ENS profile, resolving each of them, and placing the result into a basic table.
To see the result, go into frontend and run:
yarn
yarn start
Then go into backend and run:
yarn
yarn start
And run through the updated example!
Now once the Sign-In with Ethereum flow is complete and there’s an ENS profile associated with the account, the ENS name and avatar will appear along with all additional metadata from the profile in a new table.
🖼️ Resolve NFT Holdings
A completed version of the updated frontend can be found here: (05_nft_resolution/frontend).
Similar to the ENS look-up, we can also query the user’s NFT ownership. In this example, we will display basic information about the user’s NFTs in a table, via the OpenSea API. However, this could also be extended to even give the user a visual gallery view of their NFTs once connected.
First, we need to change index.html to include a new table. We’ll use the same structure as in the last chapter, separating the two tables with an <hr> tag:
src/index.html
<!DOCTYPE html>
<html>

<head>
  <meta charset="utf-8" />
  <title>SIWE Quickstart</title>
  <style>
    .hidden {
      display: none
    }

    table,
    th,
    td {
      border: 1px black solid;
    }

    .avatar {
      border-radius: 8px;
      border: 1px solid #ccc;
      width: 20px;
      height: 20px;
    }
  </style>
</head>

<body>
  <div><button id="connectWalletBtn">Connect wallet</button></div>
  <div><button id="siweBtn">Sign-in with Ethereum</button></div>
  <div><button id="infoBtn">Get session information</button></div>
  <div class="hidden" id="welcome">
  </div>
  <div class="hidden" id="profile">
    <h3>ENS Metadata:</h3>
    <div id="ensLoader"></div>
    <div id="ensContainer" class="hidden">
      <table id="ensTable">
      </table>
    </div>
  </div>
  <div class="hidden" id="noProfile">
    No ENS Profile Found.
  </div>
  <div class="hidden" id="nft">
    <h3>NFT Ownership</h3>
    <div id="nftLoader"></div>
    <div id="nftContainer" class="hidden">
      <table id="nftTable">
      </table>
    </div>
  </div>
</body>

</html>
Next, we’ll update the index.js file to reach out to OpenSea’s API using the logged-in user’s address, then format the output to place the information in the table. If the user has no NFTs, we’ll display a “No NFTs found” message in the loader div.
OpenSea’s API is a great resource for interacting with NFT data off-chain. Learn more here.
src/index.js
import { BrowserProvider } from 'ethers';
import { SiweMessage } from 'siwe';

const domain = window.location.host;
const origin = window.location.origin;
const provider = new BrowserProvider(window.ethereum);

const profileElm = document.getElementById('profile');
const noProfileElm = document.getElementById('noProfile');
const welcomeElm = document.getElementById('welcome');

const ensLoaderElm = document.getElementById('ensLoader');
const ensContainerElm = document.getElementById('ensContainer');
const ensTableElm = document.getElementById('ensTable');

const nftElm = document.getElementById('nft');
const nftLoaderElm = document.getElementById('nftLoader');
const nftContainerElm = document.getElementById('nftContainer');
const nftTableElm = document.getElementById('nftTable');

let address;

const BACKEND_ADDR = "http://localhost:3000";
async function createSiweMessage(address, statement) {
    const res = await fetch(`${BACKEND_ADDR}/nonce`, {
        credentials: 'include',
    });
    const message = new SiweMessage({
        domain,
        address,
        statement,
        uri: origin,
        version: '1',
        chainId: '1',
        nonce: await res.text()
    });
    return message.prepareMessage();
}

function connectWallet() {
    provider.send('eth_requestAccounts', [])
        .catch(() => console.log('user rejected request'));
}

async function displayENSProfile() {
    const ensName = await provider.lookupAddress(address);

    if (ensName) {
        profileElm.classList = '';

        welcomeElm.innerHTML = `Hello, ${ensName}`;
        let avatar = await provider.getAvatar(ensName);
        if (avatar) {
            welcomeElm.innerHTML += ` <img class="avatar" src=${avatar}/>`;
        }

        ensLoaderElm.innerHTML = 'Loading...';
        ensTableElm.innerHTML.concat(`<tr><th>ENS Text Key</th><th>Value</th></tr>`);
        const resolver = await provider.getResolver(ensName);

        const keys = ["email", "url", "description", "com.twitter"];
        ensTableElm.innerHTML += `<tr><td>name:</td><td>${ensName}</td></tr>`;
        for (const key of keys)
            ensTableElm.innerHTML += `<tr><td>${key}:</td><td>${await resolver.getText(key)}</td></tr>`;
        ensLoaderElm.innerHTML = '';
        ensContainerElm.classList = '';
    } else {
        welcomeElm.innerHTML = `Hello, ${address}`;
        noProfileElm.classList = '';
    }

    welcomeElm.classList = '';
}

async function getNFTs() {
    try {
        let res = await fetch(`https://api.opensea.io/api/v1/assets?owner=${address}`);
        if (!res.ok) {
            throw new Error(res.statusText)
        }

        let body = await res.json();

        if (!body.assets || !Array.isArray(body.assets) || body.assets.length === 0) {
            return []
        }

        return body.assets.map((asset) => {
            let {name, asset_contract, token_id} = asset;
            let {address} = asset_contract;
            return {name, address, token_id};
        });
    } catch (err) {
        console.error(`Failed to resolve nfts: ${err.message}`);
        return [];
    }
}

async function displayNFTs() {
    nftLoaderElm.innerHTML = 'Loading NFT Ownership...';
    nftElm.classList = '';

    let nfts = await getNFTs();
    if (nfts.length === 0) {
        nftLoaderElm.innerHTML = 'No NFTs found';
        return;
    }

    let tableHtml = "<tr><th>Name</th><th>Address</th><th>Token ID</th></tr>";
    nfts.forEach((nft) => {
        tableHtml += `<tr><td>${nft.name}</td><td>${nft.address}</td><td>${nft.token_id}</td></tr>`
    });

    nftTableElm.innerHTML = tableHtml;
    nftContainerElm.classList = '';
    nftLoaderElm.innerHTML = '';
}

async function signInWithEthereum() {
    const signer = await provider.getSigner();
    profileElm.classList = 'hidden';
    noProfileElm.classList = 'hidden';
    welcomeElm.classList = 'hidden';

    address = await signer.getAddress()
    const message = await createSiweMessage(
        address,
        'Sign in with Ethereum to the app.'
    );
    const signature = await signer.signMessage(message);

    const res = await fetch(`${BACKEND_ADDR}/verify`, {
        method: "POST",
        headers: {
            'Content-Type': 'application/json',
        },
        body: JSON.stringify({ message, signature }),
        credentials: 'include'
    });

    if (!res.ok) {
        console.error(`Failed in getInformation: ${res.statusText}`);
        return
    }
    console.log(await res.text());

    displayENSProfile();
    displayNFTs();
}

async function getInformation() {
    const res = await fetch(`${BACKEND_ADDR}/personal_information`, {
        credentials: 'include',
    });

    if (!res.ok) {
        console.error(`Failed in getInformation: ${res.statusText}`);
        return
    }

    let result = await res.text();
    console.log(result);
    address = result.split(" ")[result.split(" ").length - 1];
    displayENSProfile();
    displayNFTs();
}

const connectWalletBtn = document.getElementById('connectWalletBtn');
const siweBtn = document.getElementById('siweBtn');
const infoBtn = document.getElementById('infoBtn');
connectWalletBtn.onclick = connectWallet;
siweBtn.onclick = signInWithEthereum;
infoBtn.onclick = getInformation;
Similar to the previous guide, to see the result, go into frontend and run:
yarn
yarn start
Then go into backend and run:
yarn
yarn start
Now, when a user signs in, information on NFT holdings is displayed below the ENS information (if available).
💻 TypeScript
Getting Started
The TypeScript implementation of Sign-In with Ethereum can be found here:
Sign-In with Ethereum can be installed as an npm package. For more information and package information, click here.
📦 Migrating to v2
If you are using siwe v1.1.6, we encourage you to update to the latest version (2.1.x). The following guide walks you through how to update your application.
Differences Present in v2.0
The function validate(sig, provider) is now deprecated and is replaced by verify(VerifyParams, VerifyOpts). These two new parameters accept the following fields:
export interface VerifyParams {
  /** Signature of the message signed by the wallet */
  signature: string;

  /** RFC 4501 dns authority that is requesting the signing. */
  domain?: string;

  /** Randomized token used to prevent replay attacks, at least 8 alphanumeric characters. */
  nonce?: string;

  /**ISO 8601 datetime string of the current time. */
  time?: string;
}
export interface VerifyOpts {
  /** ethers provider to be used for EIP-1271 validation */
  provider?: providers.Provider;

  /** If the library should reject promises on errors, defaults to false */
  suppressExceptions?: boolean;
}
The new function makes it easier to match fields automatically - like domain, nonce and match against other TimeDate instead of now (time).
The return type was also modified. It now returns a SiweResponse instead of a SiweMessage, and this new object is defined by the following interface:
export interface SiweResponse {
  /** Boolean representing if the message was verified with success. */
  success: boolean;

  /** If present `success` MUST be false and will provide extra information on the failure reason. */
  error?: SiweError;

  /** Original message that was verified. */
  data: SiweMessage;
}
As part of the new API, new error types were introduced to clarify when a message fails verification. These errors are defined at:
More information regarding the rationale behind the API Harmonization and TypeScript v2.0 beta release can be found here:
🚀 TypeScript Quickstart
Quickstart
⚡ Goals
- Run a Sign-In with Ethereum example locally
- Sign-In with Ethereum using a preferred wallet
⚡ Requirements
- NodeJS version 14.0 or higher
Running the Quickstart
- First clone the
siwerepository from GitHub by running the following command:
git clone https://github.com/spruceid/siwe-notepad
- Next, enter the directory and run the example by using the following commands:
cd siwe-notepad
npm install
npm run dev
- Finally, visit the example at http://localhost:4361 (or whichever port npm allocated).

- Once the example has loaded, sign in with Ethereum by clicking on one of the wallet options, enter some text, and save that text. After disconnecting, try reconnecting to reload that text once the session has been reestablished.

The full example can be found here:
🦀 Rust
Getting Started
The Rust implementation and latest documentation for Sign-In with Ethereum can be found here:
Sign-In with Ethereum can be found on crates.io.
🧪 Elixir
Getting Started
- The Elixir implementation of Sign-In with Ethereum can be found here:
Sign-In with Ethereum can be installed as a hex. For more information and package information, click here
Installation
The package can be installed by adding siwe to your list of dependencies in mix.exs:
def deps do
  [
    {:siwe, "~> 0.3"}
  ]
end
Example
To see how this works in iex, clone this repository and from the root run:
$ mix deps.get
Then create two files message.txt:
login.xyz wants you to sign in with your Ethereum account:
0xfA151B5453CE69ABf60f0dbdE71F6C9C5868800E

Sign-In With Ethereum Example Statement

URI: https://login.xyz
Version: 1
Chain ID: 1
Nonce: ToTaLLyRanDOM
Issued At: 2021-12-17T00:38:39.834Z
signature.txt:
0x8d1327a1abbdf172875e5be41706c50fc3bede8af363b67aefbb543d6d082fb76a22057d7cb6d668ceba883f7d70ab7f1dc015b76b51d226af9d610fa20360ad1c
then run
$ iex -S mix
Once in iex, you can then run the following to see the result:
iex> {:ok, msg} = File.read("./message.txt")
...
iex> {:ok, sig} = File.read("./signature.txt")
...
iex> Siwe.parse_if_valid(String.trim(msg), String.trim(sig))
{:ok, %{
  __struct__: Siwe,
  address: "0xfA151B5453CE69ABf60f0dbdE71F6C9C5868800E",
  chain_id: "1",
  domain: "login.xyz",
  expiration_time: nil,
  issued_at: "2021-12-17T00:38:39.834Z",
  nonce: "ToTaLLyRanDOM",
  not_before: nil,
  request_id: nil,
  resources: [],
  statement: "Sign-In With Ethereum Example Statement",
  uri: "https://login.xyz",
  version: "1"
}}
Any valid SIWE message and signature pair can be substituted. The functions described below can also be tested with msg, sig, or a value set to the result Siwe.parse_if_valid.
🐍 Python
Getting Started
The Python implementation and latest documentation for Sign-In with Ethereum can be found here:
Sign-In with Ethereum can be found on PyPI.
💎 Ruby
Getting Started
The Ruby implementation of Sign-In with Ethereum can be found here:
Sign-In with Ethereum can be found on RubyGems. For more information and package information, click here.
Installation
Dependencies
Additional packages may be required to install the gem.
macOS:
brew install automake openssl libtool pkg-config gmp libffi
Linux:
sudo apt-get install build-essential automake pkg-config libtool \
                     libffi-dev libssl-dev libgmp-dev python-dev
After installing any required dependencies SIWE can be easily installed with:
gem install siwe
Usage
SIWE provides a Message class which implements EIP-4361.
Creating a SIWE Message
require 'siwe'
require 'time'

# Only the mandatory arguments
Siwe::Message.new(
  "domain.example",
  "0x9D85ca56217D2bb651b00f15e694EB7E713637D4",
  "some.uri",
  "1"
)

# Complete SIWE message with default values
Siwe::Message.new(
  "domain.example",
  "0x9D85ca56217D2bb651b00f15e694EB7E713637D4",
  "some.uri",
  "1",
  {
    issued_at: Time.now.utc.iso8601,
    statement: "Example statement for SIWE",
    nonce: Siwe::Util.generate_nonce,
    chain_id: "1",
    expiration_time: "",
    not_before: "",
    request_id: "",
    resources: []
  }
)
Parsing a SIWE Message
From EIP-4361:
To parse from EIP-4361, use Siwe::Message.from_message:
require 'siwe'

Siwe::Message.from_message "domain.example wants you to sign in with your Ethereum account:\n0x9D85ca56217D2bb651b00f15e694EB7E713637D4\n\nExample statement for SIWE\n\nURI: some.uri\nVersion: 1\nChain ID: 1\nNonce: k1Ne4KWzBHYEFQo8\nIssued At: 2022-02-03T20:06:19Z"
From JSON string:
Messages can be parsed to and from JSON strings, using Siwe::Message.from_json_string and Siwe::Message.to_json_string respectively:
require 'siwe'

Siwe::Message.from_json_string "{\"domain\":\"domain.example\",\"address\":\"0x9D85ca56217D2bb651b00f15e694EB7E713637D4\",\"uri\":\"some.uri\",\"version\":\"1\",\"chain_id\":\"1\",\"nonce\":\"k1Ne4KWzBHYEFQo8\",\"issued_at\":\"2022-02-03T20:06:19Z\",\"statement\":\"Example statement for SIWE\",\"expiration_time\":\"\",\"not_before\":\"\",\"request_id\":\"\",\"resources\":[]}"

Siwe::Message.new(
  "domain.example",
  "0x9D85ca56217D2bb651b00f15e694EB7E713637D4",
  "some.uri",
  "1"
).to_json_string
Verifying and Authenticating a SIWE Message
Verification and authentication is performed via EIP-191, using the address field of the SiweMessage as the expected signer. The validate method checks message structural integrity, signature address validity, and time-based validity attributes.
begin
    message.validate(signature) # returns true if valid, throws otherwise
rescue Siwe::ExpiredMessage
    # Used when the message is already expired. (Expires At < Time.now)
rescue Siwe::NotValidMessage
    # Used when the message is not yet valid. (Not Before > Time.now)
rescue Siwe::InvalidSignature
    # Used when the signature doesn't correspond to the address of the message.
end
Serialization of a SIWE Message
Siwe::Message instances can also be serialized as their EIP-4361 string representations via the Siwe::Message.prepare_message method:
require 'siwe'

Siwe::Message.new(
  "domain.example",
  "0x9D85ca56217D2bb651b00f15e694EB7E713637D4",
  "some.uri",
  "1"
).prepare_message
Example
Parsing and verifying a Siwe::Message:
require 'siwe'

begin
    message = Siwe::Message.from_message "https://example.com wants you to sign in with your Ethereum account:\n0xA712a0AFBFA8656581BfA96352c9EdFc519e9cad\n\n\nURI: https://example.com\nVersion: 1\nChain ID: 1\nNonce: 9WrH24z8zpiYOoBQ\nIssued At: 2022-02-04T15:52:03Z"
    message.validate "aca5e5649a357cee608ecbd1a8455b4143311381636b88a66ec7bcaf64b3a4743ff2c7cc18501a3401e182f79233dc73fc56d01506a6098d5e7e4d881bbb02921c"
    puts "Congrats, your message is valid"
rescue Siwe::ExpiredMessage
    # Used when the message is already expired. (Expires At < Time.now)
rescue Siwe::NotValidMessage
    # Used when the message is not yet valid. (Not Before > Time.now)
rescue Siwe::InvalidSignature
    # Used when the signature doesn't correspond to the address of the message.
end
🛤️ Rails
Overview
Rails is a full-stack framework built on top of Ruby to create web apps. The following are a set of gems and examples to get you started incorporating Sign-In with Ethereum to your Rails application.
Requirements
Two gems have been created in order to make different examples of Rails integrations possible:
Which is a Rails gem that adds Sign-In with Ethereum local sign-in routes.
Which provides an OmniAuth strategy for Sign In With Ethereum.
Examples
Currently, there are three examples of Sign-In with Ethereum being used for authentication in Rails applications:
Which shows how to manually add endpoints to generate and verify the Sign-In with Ethereum message, and handle session-based user logins on a Rails application.
Which shows how to use siwe_rails gem to set up and configure the endpoints to generate and verify a Sign-In with Ethereum message in a Rails application.
Which shows how to use and configure the omniauth-siwe provider with OmniAuth in a Rails application.
Each of these examples can be found in the siwe-rails-examples repository.
To get started with any of the examples, clone the siwe-rails-examples repository locally:
git clone https://github.com/spruceid/siwe-rails-examples
When testing, please make sure to update the Ruby version specified in the example’s Gemfile to the current version of Ruby that you are using. You can check your version of Ruby by entering ruby -v in your terminal.
To build and test each example, check out the following guides:
Custom-Controller
- First, enter the
custom-controllerdirectory insiwe-rails-examples.
cd siwe-rails-examples/custom-controller
- Finally, run the following commands to run the example:
bundle install
bin/rails db:migrate RAILS_ENV=development
bundle exec rails server
This executes any database migrations, installs the proper gems, and runs the Rails example. Visit the example by visiting localhost:3000 in your web browser.
You should now see the example, and be able to Sign-In with Ethereum to authenticate and establish a session.
Rails-Engine
- Clone the
siwe_railsgem in the same parent directory assiwe-rails-examples:
# from siwe-rails-examples
cd ..
git clone https://github.com/spruceid/siwe_rails
- Next, enter the
rails-enginedirectory insiwe-rails-examples.
cd siwe-rails-examples/rails-engine
- Finally, run the following commands to run the example:
bundle install
bin/rails db:migrate RAILS_ENV=development
bundle exec rails server
This executes any database migrations, installs the proper gems, and runs the Rails example. Visit the example by visiting localhost:3000 in your web browser.
You should now see the example, and be able to Sign-In with Ethereum to authenticate and establish a session.
OmniAuth
- Clone the
omniauth-siwegem in the same parent directory assiwe-rails-examples:
# from siwe-rails-examples
cd ..
git clone https://github.com/spruceid/omniauth-siwe
- Next, enter the
omniauthdirectory insiwe-rails-examples.
cd siwe-rails-examples/omniauth
- To be able to use oidc.login.xyz you will need to register as a client. To do that, use the following command, filling out your own
redirect_uris, according to your setup:
 curl -X POST 'https://oidc.login.xyz/register' \
  -H 'Content-type: application/json' \
  --data '{"redirect_uris": ["http://localhost:3000/auth/siwe/callback"]}'
In this case, since we’re running this example on localhost:3000, we need the redirect_uris to contain http://localhost:3000/auth/siwe/callback.
- After that, update
omniauth.rbunderomniauth/config/initializerswith both the provided identifier (client_id) and secret (client_secret):
omniauth.rb
  client_options = {
    scheme: 'https',
    host: 'oidc.login.xyz',
    port: 443,
    authorization_endpoint: '/authorize',
    token_endpoint: '/token',
    userinfo_endpoint: '/userinfo',
    jwks_uri: '/jwk',
    identifier: 'your-client-id',
    secret: 'your-client-secret'
  }

  provider :siwe, issuer: 'https://oidc.login.xyz/', client_options: client_options
- Finally, run the following commands to run the example:
bundle install
bundle exec rails server
This installs the proper gems and runs the Rails example. Visit the example by visiting localhost:3000 in your web browser.
You should now see the example, and be able to Sign-In with Ethereum to authenticate and establish a session.
💠 Go
Getting started
- The Go implementation of Sign-In with Ethereum can be found here:
Installation
SIWE can be easily installed in any Go project by running:
go get -u github.com/spruceid/siwe-go
Usage
SIWE exposes a Message struct which implements EIP-4361.
Parsing a SIWE Message
Parsing is done via the siwe.ParseMessage function:
var message *siwe.Message
var err error

message, err = siwe.ParseMessage(messageStr)
The function will return a nil pointer and an error if there was an issue while parsing.
Verifying and Authenticating a SIWE Message
Verification and Authentication is performed via EIP-191, using the address field of the Message as the expected signer. This returns the Ethereum public key of the signer:
var publicKey *ecdsa.PublicKey
var err error

publicKey, err = message.VerifyEIP191(signature)
The time constraints (expiry and not-before) can also be validated, at current or particular times:
var message *siwe.Message

if message.ValidNow() {
  // ...
}

// equivalent to

if message.ValidAt(time.Now().UTC()) {
  // ...
}
Combined verification of time constraints and authentication can be done in a single call with verify:
var publicKey *ecdsa.PublicKey
var err error

// Optional nonce variable to be matched against the
// built message struct being verified
var optionalNonce *string

// Optional timestamp variable to verify at any point
// in time, by default it will use `time.Now()`
var optionalTimestamp *time.Time

publicKey, err = message.Verify(signature, optionalNonce, optionalTimestamp)

// If you won't be using nonce matching and want
// to verify the message at the current time, it's
// safe to pass `nil` in both arguments
publicKey, err = message.Verify(signature, nil, nil)
Serialization of a SIWE Message
Message instances can also be serialized as their EIP-4361 string representations via the String method:
fmt.Printf("%s", message.String())
Signing Messages from Go code
To sign messages directly from Go code, you will need to do it like shown below to correctly follow the personal_sign format:
func signHash(data []byte) common.Hash {
    msg := fmt.Sprintf("\x19Ethereum Signed Message:\n%d%s", len(data), data)
    return crypto.Keccak256Hash([]byte(msg))
}

func signMessage(message string, privateKey *ecdsa.PrivateKey) ([]byte, error) {
    sign := signHash([]byte(message))
    signature, err := crypto.Sign(sign.Bytes(), privateKey)

    if err != nil {
        return nil, err
    }

    signature[64] += 27
    return signature, nil
}
💬 Discourse
Overview
Discourse is an open-source discussion platform used for most crypto governances and projects to discuss proposals, updates, and research. The following is a quick guide on how to add Sign-In with Ethereum to your existing Discourse.
Note
This guide is currently compatible with Discourse’s official distribution. The discussion about the issues with other builds can be followed here.
The Sign-In with Ethereum plugin still requires users to enter an email to associate with their accounts after authenticating for the first time. If the user owns an ENS address, it will be the default selected username. Once an email address is associated, users can then sign in using the SIWE option at any time.
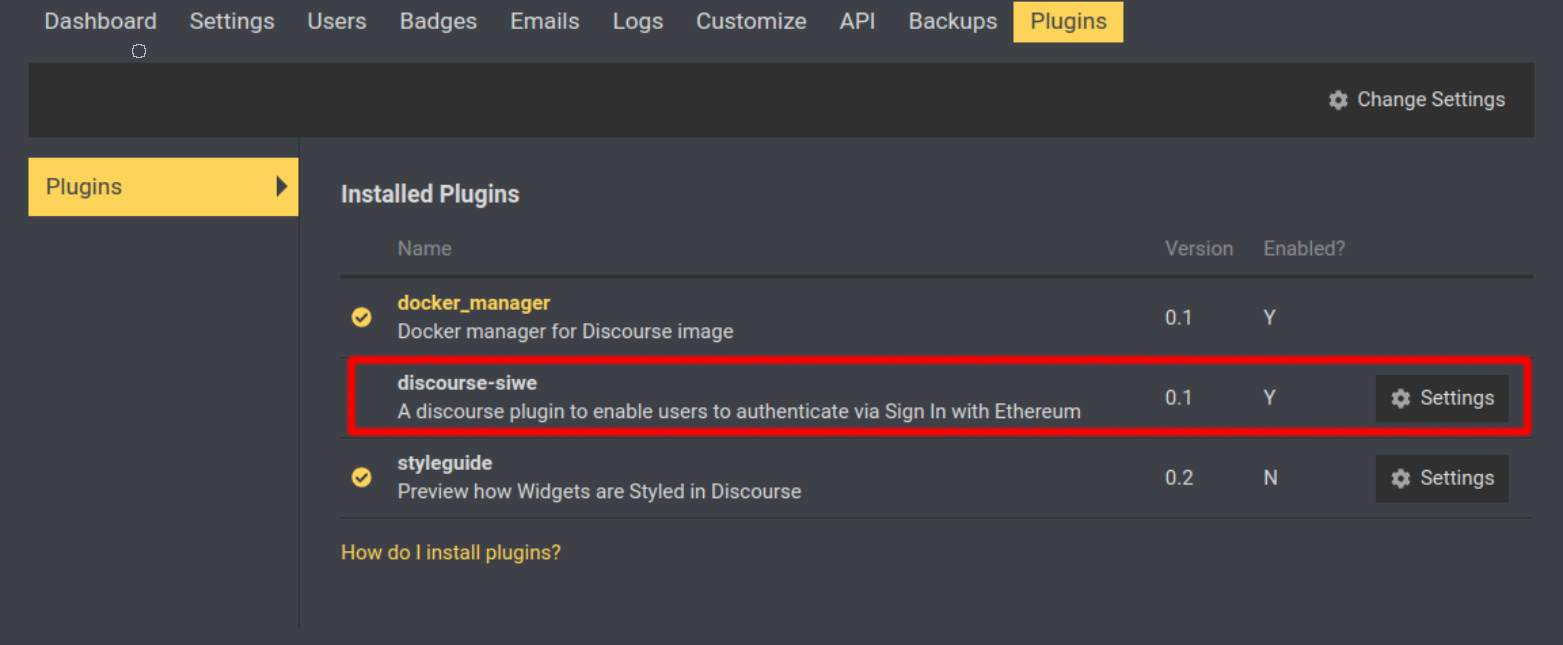
Enabling the Plugin
To install and enable the plugin on your self-hosted Discourse use the following method:
- Access your container’s
app.ymlfile (present in/var/discourse/containers/)
cd /var/discourse
nano containers/app.yml
- Add the plugin’s repository URL to your container’s
app.ymlfile:
app.yml
hooks:
  before_code:                             # <-- added
    - exec:                                # <-- added
        cmd:                               # <-- added
          - gem install rubyzip            # <-- added
  after_code:
    - exec:
      cd: $home/plugins
      cmd:
        - sudo -E -u discourse git clone https://github.com/discourse/docker_manager.git
        - sudo -E -u discourse git clone https://github.com/spruceid/discourse-siwe-auth.git   # <-- added
- Follow the existing format of the
docker_manager.gitline; if it does not containsudo -E -u discoursethen insert- git clone https://github.com/spruceid/discourse-siwe-auth.git. - Rebuild the container:
cd /var/discourse
./launcher rebuild app
To disable it either remove the plugin or uncheck discourse siwe enabled at (Admin Settings -> Plugins -> discourse-siwe -> discourse siwe enabled).
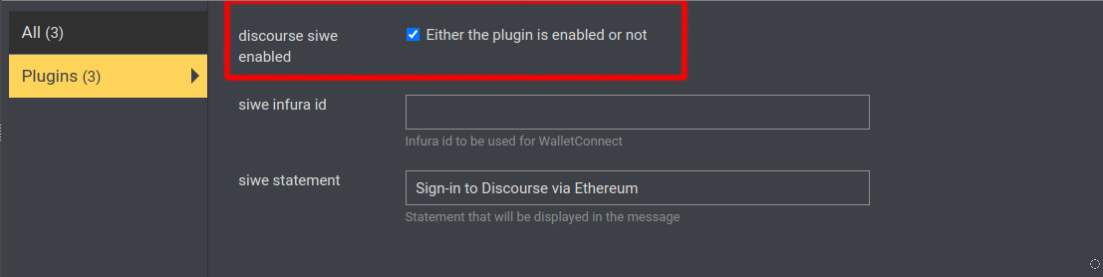
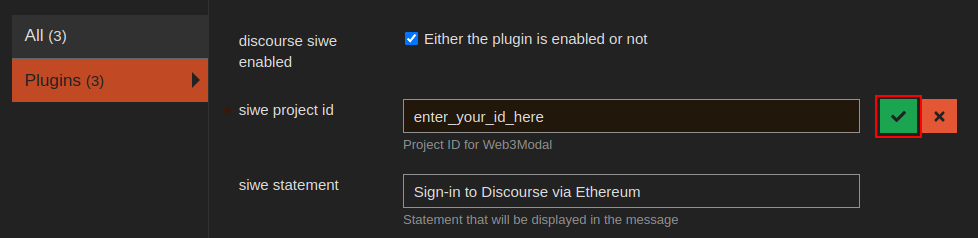
Create a Project ID
This plugin uses the newest Web3Modal v2, in order to use it you need to create a free project id at https://cloud.walletconnect.com/sign-in and configure it in the plugin.
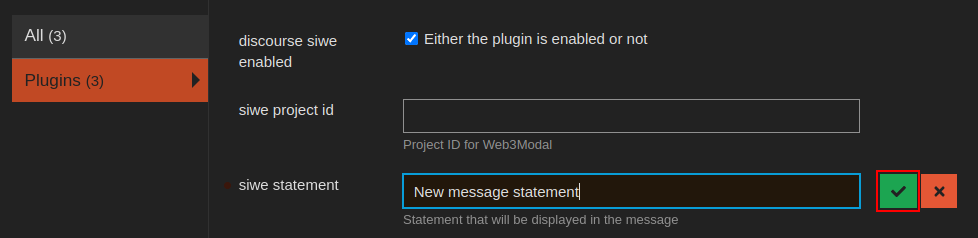
Edit the message statement
By default, a statement is added to the messages: Sign-in to Discourse via Ethereum. To edit this statement access the settings (same as before) and update it.
🔑 NextAuth.js
NextAuth.js is an easy-to-implement, full-stack (client/server) open-source authentication library originally designed for Next.js and serverless applications.
The library provides the ability to set up a custom credential provider, which we can take advantage of in order to authenticate users using their existing Ethereum wallet via Sign-In with Ethereum (EIP-4361).
The complete example can be found here.
Getting started
⚡ Requirements
- Yarn
- Node.js
- MetaMask browser extension wallet
- An Ethereum account in the installed MetaMask wallet
- First clone the official NextAuth.js example using your terminal:
git clone https://github.com/nextauthjs/next-auth-example
- Then, switch to the project directory:
cd next-auth-example
- After cloning, modify the given
.env.local.examplefile, and populate it with the following variables:
NEXTAUTH_URL=http://localhost:3000
NEXTAUTH_SECRET=somereallysecretsecret
Note: After this, rename the file to .env.local. This example will be routed to http://localhost:3000.
- Next Add
siwe,ethers, andwagmias dependencies. In this example, we’re using wagmi, which is a well-known React hooks library for Ethereum. In your terminal, navigate to the project we originally cloned and add the dependencies via the following commands:
yarn add siwe@beta ethers wagmi
- Now, modify
pages/_app.tsxto inject theWagmiProvidercomponent:
pages/_app.tsx
import { Session } from "next-auth"
import { SessionProvider } from "next-auth/react"
import type { AppProps } from "next/app"
import { WagmiConfig, createClient, configureChains, chain } from "wagmi"
import { publicProvider } from "wagmi/providers/public"
import "./styles.css"

export const { chains, provider } = configureChains(
  [chain.mainnet, chain.polygon, chain.optimism, chain.arbitrum],
  [publicProvider()]
)

const client = createClient({
  autoConnect: true,
  provider,
})

// Use of the <SessionProvider> is mandatory to allow components that call
// `useSession()` anywhere in your application to access the `session` object.
export default function App({
  Component,
  pageProps,
}: AppProps<{
  session: Session;
}>) {
  return (
    <WagmiConfig client={client}>
      <SessionProvider session={pageProps.session} refetchInterval={0}>
        <Component {...pageProps} />
      </SessionProvider>
    </WagmiConfig>
  )
}
- We’re going to now add the provider that will handle the message validation. Since it’s not possible to sign in using the default page, the original provider should be removed from the list of providers before rendering. Modify
pages/api/auth/[...nextauth].tswith the following:
pages/api/auth/[…nextauth].ts
import NextAuth from "next-auth"
import CredentialsProvider from "next-auth/providers/credentials"
import { getCsrfToken } from "next-auth/react"
import { SiweMessage } from "siwe"

// For more information on each option (and a full list of options) go to
// https://next-auth.js.org/configuration/options
export default async function auth(req: any, res: any) {
  const providers = [
    CredentialsProvider({
      name: "Ethereum",
      credentials: {
        message: {
          label: "Message",
          type: "text",
          placeholder: "0x0",
        },
        signature: {
          label: "Signature",
          type: "text",
          placeholder: "0x0",
        },
      },
      async authorize(credentials) {
        try {
          const siwe = new SiweMessage(JSON.parse(credentials?.message || "{}"))
          const nextAuthUrl = new URL(process.env.NEXTAUTH_URL)

          const result = await siwe.verify({
            signature: credentials?.signature || "",
            domain: nextAuthUrl.host,
            nonce: await getCsrfToken({ req }),
          })

          if (result.success) {
            return {
              id: siwe.address,
            }
          }
          return null
        } catch (e) {
          return null
        }
      },
    }),
  ]

  const isDefaultSigninPage =
    req.method === "GET" && req.query.nextauth.includes("signin")

  // Hide Sign-In with Ethereum from default sign page
  if (isDefaultSigninPage) {
    providers.pop()
  }

  return await NextAuth(req, res, {
    // https://next-auth.js.org/configuration/providers/oauth
    providers,
    session: {
      strategy: "jwt",
    },
    secret: process.env.NEXTAUTH_SECRET,
    callbacks: {
      async session({ session, token }: { session: any; token: any }) {
        session.address = token.sub
        session.user.name = token.sub
        session.user.image = "https://www.fillmurray.com/128/128"
        return session
      },
    },
  })
}
- The default sign-in page can’t be used because there is no way to hook wagmi to listen for clicks on the default sign-in page provided by next-auth, so a custom page must be created to handle the sign-in flow. Create
pages/siwe.tsxand populate it with the following:
pages/siwe.tsx
import { getCsrfToken, signIn, useSession } from "next-auth/react"
import { SiweMessage } from "siwe"
import { useAccount, useConnect, useNetwork, useSignMessage } from "wagmi"
import Layout from "../components/layout"
import { InjectedConnector } from 'wagmi/connectors/injected'
import { useEffect, useState } from "react"

function Siwe() {
  const { signMessageAsync } = useSignMessage()
  const { chain } = useNetwork()
  const { address, isConnected } = useAccount()
  const { connect } = useConnect({
    connector: new InjectedConnector(),
  });
  const { data: session, status } = useSession()

  const handleLogin = async () => {
    try {
      const callbackUrl = "/protected"
      const message = new SiweMessage({
        domain: window.location.host,
        address: address,
        statement: "Sign in with Ethereum to the app.",
        uri: window.location.origin,
        version: "1",
        chainId: chain?.id,
        nonce: await getCsrfToken(),
      })
      const signature = await signMessageAsync({
        message: message.prepareMessage(),
      })
      signIn("credentials", {
        message: JSON.stringify(message),
        redirect: false,
        signature,
        callbackUrl,
      })
    } catch (error) {
      window.alert(error)
    }
  }

  useEffect(() => {
    console.log(isConnected);
    if (isConnected && !session) {
      handleLogin()
    }
  }, [isConnected])

  return (
    <Layout>
      <button
        onClick={(e) => {
          e.preventDefault()
          if (!isConnected) {
            connect()
          } else {
            handleLogin()
          }
        }}
      >
        Sign-in
      </button>
    </Layout>
  )
}

export async function getServerSideProps(context: any) {
  return {
    props: {
      csrfToken: await getCsrfToken(context),
    },
  }
}

Siwe.Layout = Layout

export default Siwe
- Modify
pages/styles.cssby appending the following CSS:
pages/styles.css
button {
  margin: 0 0 0.75rem 0;
  text-decoration: none;
  padding: 0.7rem 1.4rem;
  border: 1px solid #346df1;
  background-color: #346df1;
  color: #fff;
  font-size: 1rem;
  border-radius: 4px;
  transition: all 0.1s ease-in-out;
  font-weight: 500;
  position: relative;

}

button:hover {
  cursor: pointer;
  box-shadow: inset 0 0 5rem rgb(0 0 0 / 20%);
}
Finally, modify the components/header.tsx in order to clean it up and add a SIWE tab to navigate to the newly created page:
components/header.tsx
import { signOut, useSession } from "next-auth/react"
import Link from "next/link"
import { useDisconnect } from "wagmi"
import styles from "./header.module.css"

// The approach used in this component shows how to build a sign in and sign out
// component that works on pages which support both client and server side
// rendering, and avoids any flash incorrect content on initial page load.
export default function Header() {
  const { data: session, status } = useSession()
  const loading = status === "loading"
  const { disconnect } = useDisconnect()

  return (
    <header>
      <noscript>
        <style>{`.nojs-show { opacity: 1; top: 0; }`}</style>
      </noscript>
      <div className={styles.signedInStatus}>
        <p
          className={`nojs-show ${!session && loading ? styles.loading : styles.loaded}`}
        >
          {!session && (
            <>
              <span className={styles.notSignedInText}>
                You are not signed in
              </span>
            </>
          )}
          {session?.user && (
            <>
              {session.user.image && (
                <span
                  style={{ backgroundImage: `url('${session.user.image}')` }}
                  className={styles.avatar}
                />
              )}
              <span className={styles.signedInText}>
                <small>Signed in as</small>
                <br />
                <strong>{session.user.email ?? session.user.name}</strong>
              </span>
              <a
                href={`/api/auth/signout`}
                className={styles.button}
                onClick={(e) => {
                  e.preventDefault()
                  disconnect()
                  signOut()
                }}
              >
                Sign out
              </a>
            </>
          )}
        </p>
      </div>
      <nav>
        <ul className={styles.navItems}>
          <li className={styles.navItem}>
            <Link href="/">
              Home
            </Link>
          </li>
          <li className={styles.navItem}>
            <Link href="/siwe">
              SIWE
            </Link>
          </li>
        </ul>
      </nav>
    </header>
  )
}
- Run the application using the following commands:
yarn install
yarn dev
Navigate to localhost:3000 - now you are now ready to Sign-In with Ethereum. Just click the SIWE link in the header, hit the “Sign-In with Ethereum” button, sign the message, and you are now authenticated.
If you face the following error:
Error: Invalid <Link> with <a> child. Please remove <a> or use <Link legacyBehavior>.
go to components/footer.tsx and remove the <a> tag from Policy at line 21.
🖥️ Auth0
Auth0 is the leading platform for authentication and authorization for web2 applications and services in retail, publishing, B2B SaaS, and more. Sign-In with Ethereum was recently integrated into Auth0 by Spruce in collaboration with Auth0 and the Auth0 Lab team.
The integration uses the open-source OpenID Connect Identity Provider (hosted under oidc.login.xyz) for Sign-In with Ethereum implementation in Rust:
The entire workflow involved can be seen in this activity diagram:
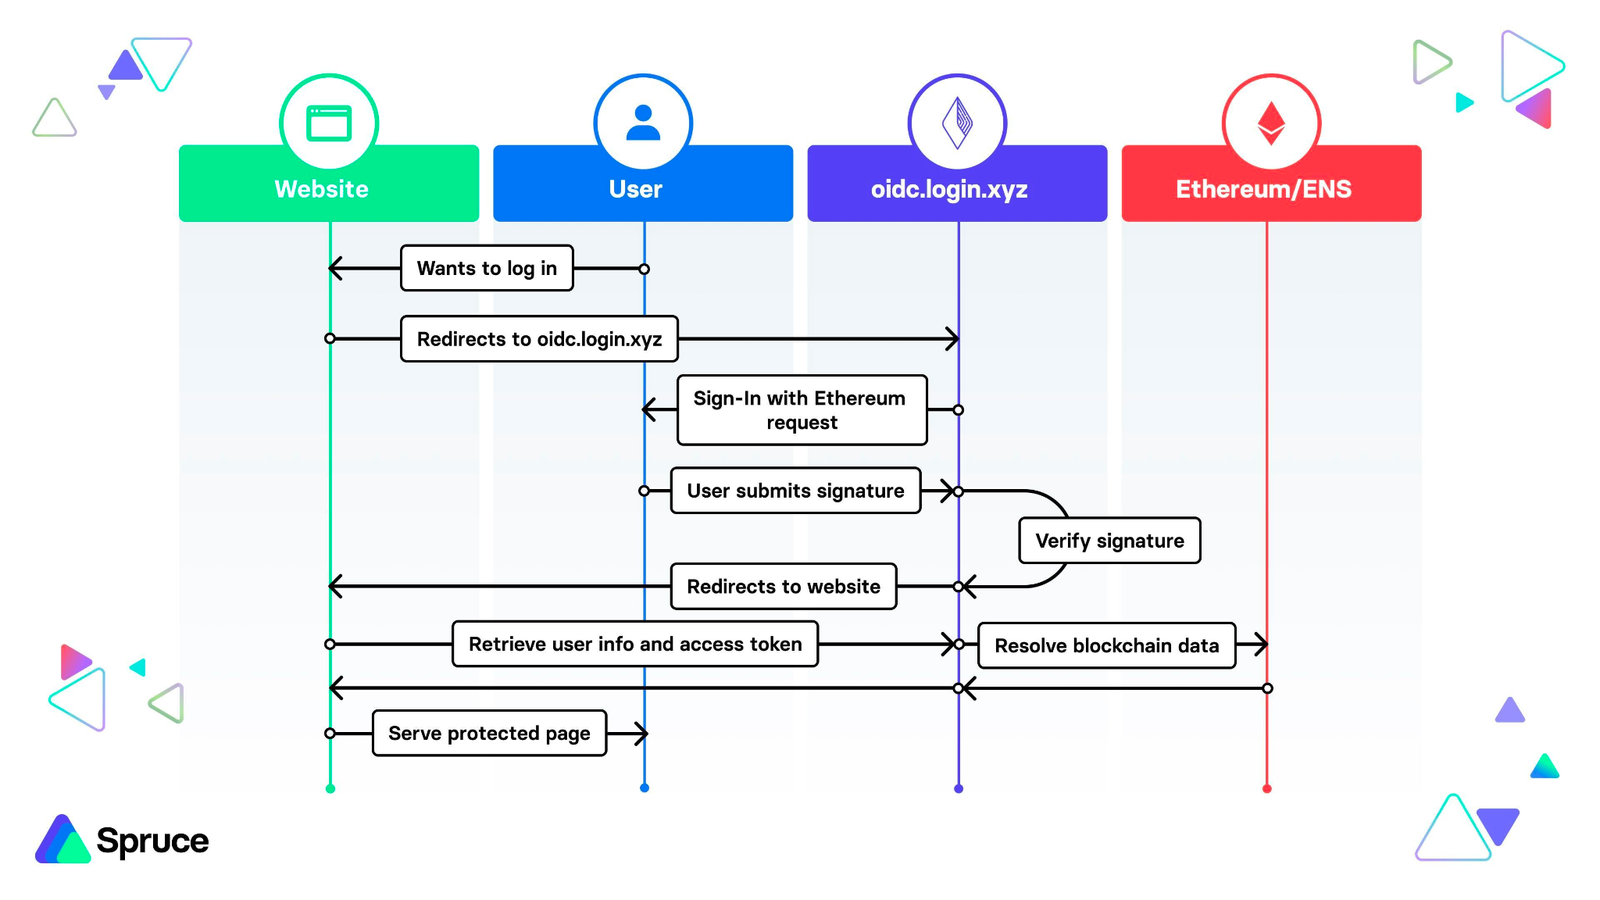
An example application to show off the authentication flow can be found here. The example features a mock NFT gallery website where users can Sign-In with Ethereum, and their NFT holdings are resolved via the OpenSea API once authenticated.
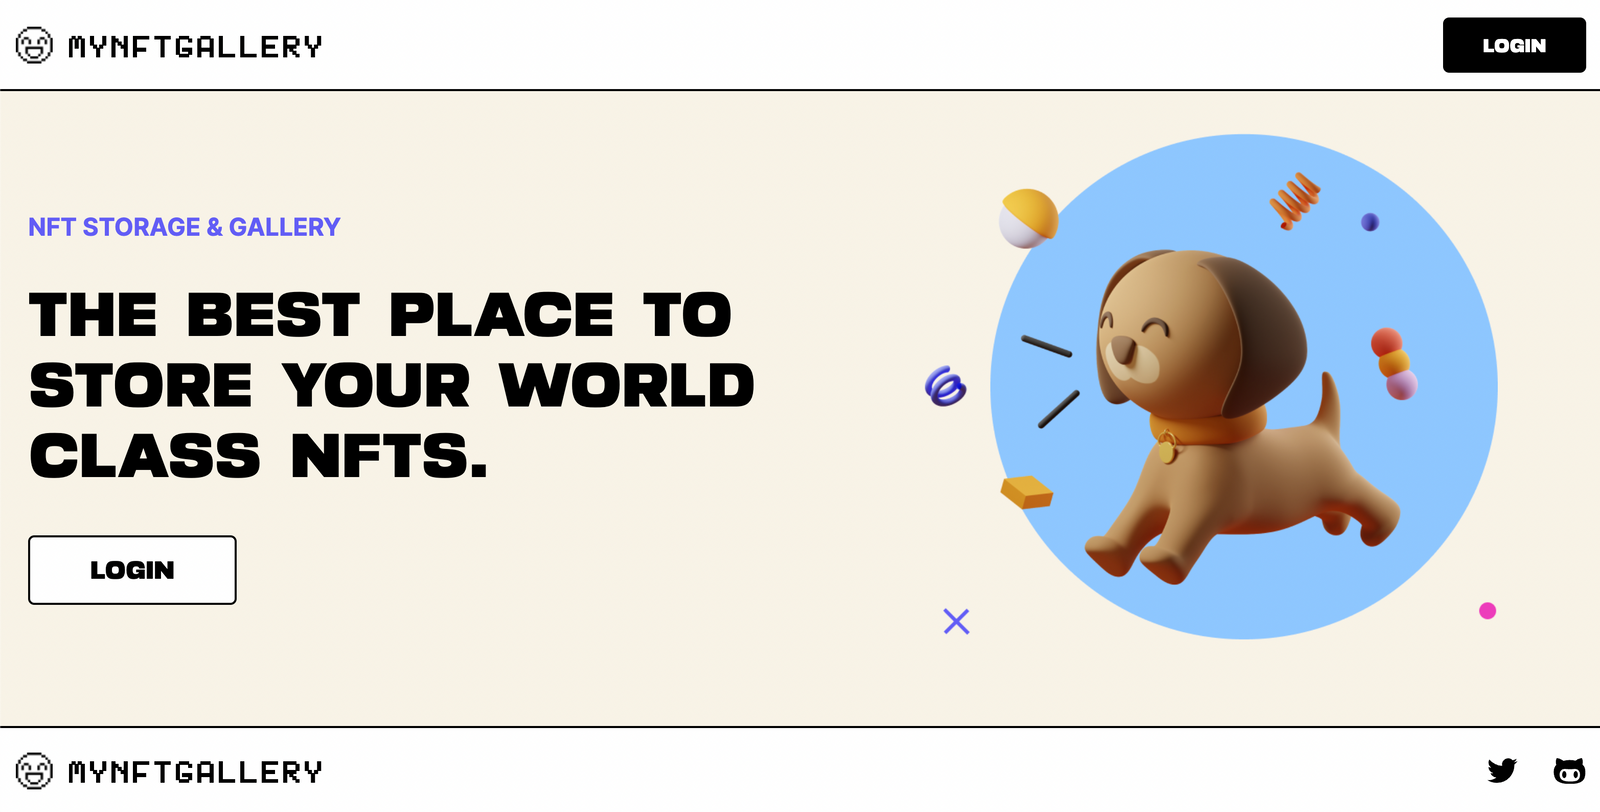
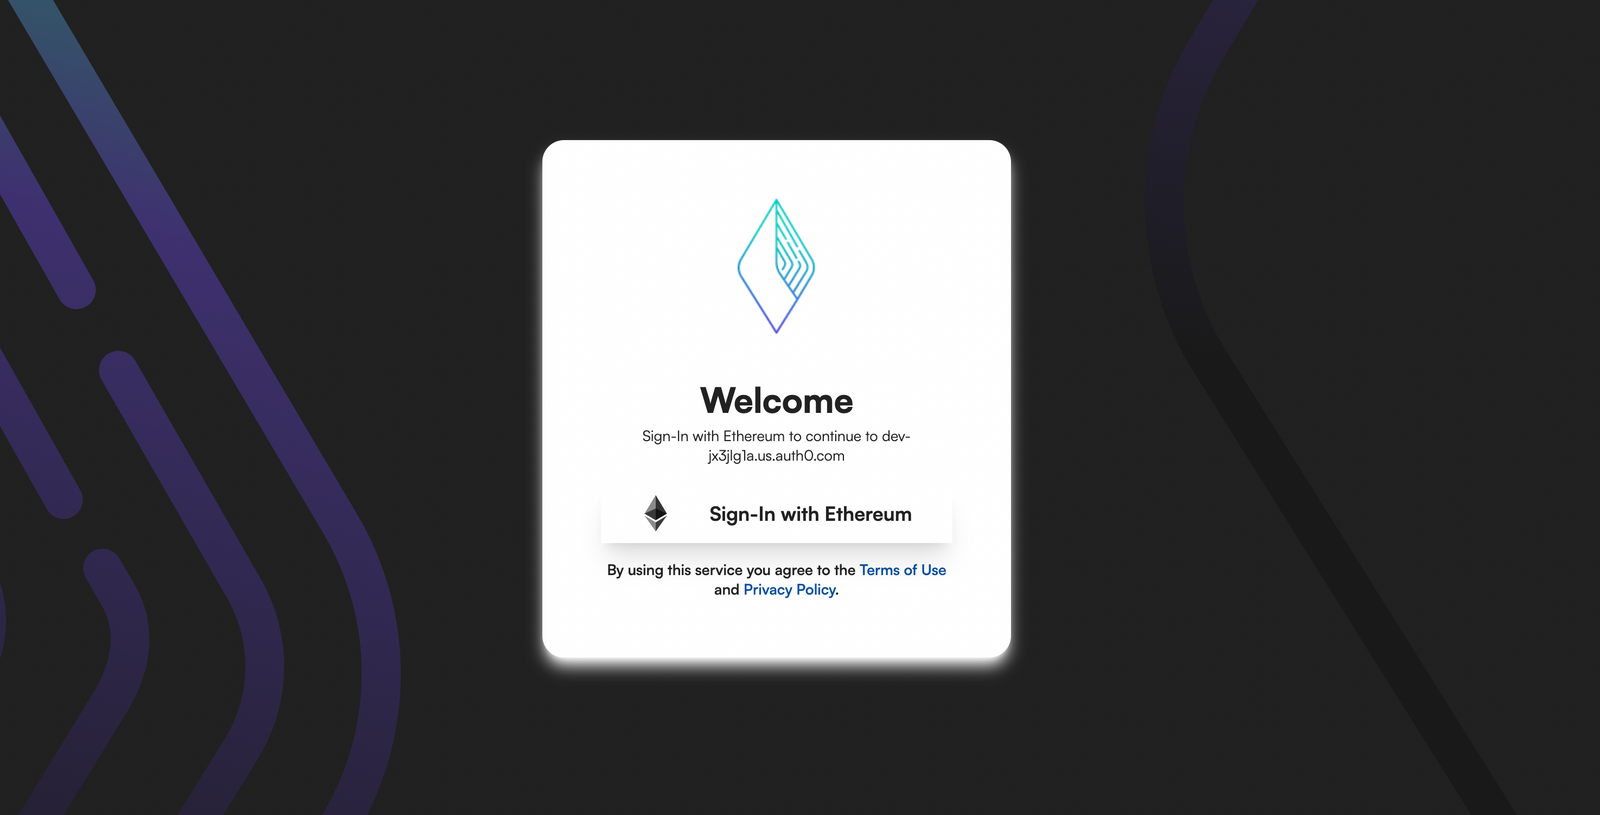
After hitting the login button, users are redirected to the Auth0 flow and Sign-In with Ethereum using the provided interface. Once authenticated, users are then redirected back to the application where they can view their gallery.
As part of the login, the application also resolves the user’s ENS name if present. Users can then return to the main splash screen or disconnect from the application.
🔒 Security Considerations
Sign-In with Ethereum Security Considerations
When using SIWE, implementers should aim to mitigate security issues on both the client and server. This is a growing collection of best practices for implementers, but no security checklist can ever be truly complete.
Message Generation and Validation
When processing a SIWE message on the backend, it must be validated as per specified in EIP-4361. This is achieved in the quickstart guide by creating the entire SIWE message on the backend, and verifying that the message signed was identical with a valid signature.
However, some implementers may choose not to generate the signing message entirely on the server-side, and instead, have the frontend request specific field values from the server or otherwise agree on a value generation method. The backend then asserts that the received signed message matches what is expected during verification.
(WIP) Notes on select fields and their value selection:
- nonce. To prevent replay attacks, a nonce should be selected with sufficient entropy for the use case, and the server should assert that the nonce matches the expected value. In some systems, the server and client may agree to use a nonce derived from a recent block hash or system time, reducing server interaction.
- domain. Wallets conforming to EIP-4361 are able to check for (or even generate) correct domain bindings to prevent phishing attacks, i.e., that the website “example.org” is indeed securely serving the SIWE message beginning with “example.org wants you to sign in with…”
🆔 ENS Profile Resolution
Resolve ENS Profiles for users signing into a service
Requirements
- ethers >= v5.5.3
The user’s linked Ethereum Name Service (ENS) information can be retrieved after their Ethereum address is known. After the user connects with their wallet but before they Sign-In with Ethereum, ENS information can be used to provide additional context to the user about which account is connected.
If the user completes Sign-In with Ethereum to authenticate, the ENS data resolved from their Ethereum address may be used as part of the authenticated session, such as checking that the address’s default ENS name is alisha.eth before granting access to certain pages or resources.
The information can be retrieved using the ENS resolution methods in ethers:
import { ethers } from 'ethers';

const provider = new ethers.providers.EtherscanProvider()
const address = '0x9297A132AF2A1481441AB8dc1Ce6e243d879eaFD'

const ensName = await provider.lookupAddress(address)
const ensAvatarUrl = await provider.getAvatar(ensName)

const ensResolver = await provider.getResolver(ensName)
// You can fetch any key stored in their ENS profile.
const twitterHandle = await ensResolver.getText('com.twitter')
The user’s Avatar location can be resolved using ensResolver.getText, but getAvatar is recommended as it resolves NFT avatars to a URL.
The EtherscanProvider above uses a shared API key and is therefore rate-limited. For a production application, we strongly recommend using a new API key with Etherscan or another compatible provider.
👥 Community Highlights
Community-Driven Sign-In with Ethereum Guides and Builds
The following is a list of libraries, guides, and more made available by the Sign-In with Ethereum community. Note - some of the listed items may have not yet undergone formal security audits, and may also be experimental or alpha stage.
💻 Libraries and Projects
- https://github.com/payton/django-siwe-auth/ (Django)
- https://github.com/jaerith/siwe-nethereum (C#)
- https://github.com/joshrutkowski/siwe-starter (Next.js + Iron-Session)
- https://github.com/artpi/wp-dao (WordPress)
- https://github.com/mikery/serverless-siwe (Serverless SIWE)
- https://github.com/vanruch/fastify-siwe (Fastify SIWE)
- https://github.com/moonstoneid/siwe-java (Java)
📖 Guides
🔌 OIDC Provider
Rationale
Many organizations want to consolidate the Sign-In with Ethereum workflow to a single identity service (Identity Provider or IdP) that could be used to access all their federated services (Relying Parties or RPs) using OpenID Connect to forward the user’s session. This reduces overhead and mitigates security risks by consolidating authentication to one protected site instead of several, especially in complex IT systems that have many services for their users to access.
Getting Started
The OIDC Provider implementation of Sign-In with Ethereum can be found here:
Currently, two runtime modes are supported: (1) a standalone executable (using Axum and Redis) and (2) a WASM module within a Cloudflare Worker. Both are built from the same codebase, specializing at build time. Compilation with a cargo target of wasm32 will build for Cloudflare Worker deployments.
For convenience, a fully deployed and hosted version of the OpenID Connect Provider (OP) is available under https://oidc.signinwithethereum.org. See Hosted OIDC Provider for more information.
📋 Deployment Guide
Build & Deploy
Deploying to a Cloudflare Worker
First, ensure wrangler is installed and ready to interact with Cloudflare Worker API. You will need a Cloudflare account. Clone the project repository, and setup your Cloudflare Worker project after authenticating with Wrangler.
git clone https://github.com/spruceid/siwe-oidc
cd siwe-oidc
wrangler login
wrangler whoami  # account_id
wrangler kv:namespace create SIWE_OIDC  # kv_namespaces entry
Use the example Wrangler configuration file as a starting template:
cp wrangler_example.toml wrangler.toml
Populate the following fields for the Cloudflare Worker:
account_id: the Cloudflare account ID;zone_id: (Optional) DNS zone ID; andkv_namespaces: an array of KV namespaces
Create and publish the worker:
wrangler publish
The IdP currently only supports having the frontend under the same subdomain as the API. Here is the configuration for Cloudflare Pages:
Build command:cd js/ui && npm install && npm run build;Build output directory:/static; andRoot directory:/. And you will need to add some rules to do the routing between the Page and the Worker. Here are the rules for the Worker (the Page being used as the fallback on the subdomain):
siweoidc.example.com/s*
siweoidc.example.com/u*
siweoidc.example.com/r*
siweoidc.example.com/a*
siweoidc.example.com/t*
siweoidc.example.com/j*
siweoidc.example.com/.w*
Stand-Alone Binary
Dependencies
Redis, or a Redis compatible database (e.g. MemoryDB in AWS), is required.
Starting the IdP
The Docker image is available at ghcr.io/spruceid/siwe_oidc:0.1.0. Here is an example usage:
docker run -p 8000:8000 -e SIWEOIDC_ADDRESS="0.0.0.0" -e SIWEOIDC_REDIS_URL="redis://redis" ghcr.io/spruceid/siwe_oidc:latest
It can be configured either with the siwe-oidc.toml configuration file, or through environment variables:
SIWEOIDC_ADDRESSis the IP address to bind to.SIWEOIDC_REDIS_URLis the URL to the Redis instance.SIWEOIDC_BASE_URLis the URL you want to advertise in the OIDC configuration (e.g.https://oidc.example.com).SIWEOIDC_RSA_PEMis the signing key, in PEM format. One will be generated if none is provided.
OIDC Functionalities
The current flow is very basic – after the user is authenticated you will receive an Ethereum address as the subject (sub field).
For the core OIDC information, it is available under /.well-known/openid-configuration.
OIDC Conformance Suite:
- 🟨 (25/29, and 10 skipped) basic (
emailscope skipped,profilescope partially supported, ACR,prompt=noneand request URIs yet to be supported); - 🟩 config;
- 🟧 dynamic code.
Development
Cloudflare Worker
wrangler dev
You can now use http://127.0.0.1:8787/.well-known/openid-configuration.
At the moment it’s not possible to use it end-to-end with the frontend as they need to share the same host (i.e. port), unless using a local load-balancer.
Stand Alone Binary
A Docker Compose is available to test the IdP locally with Keycloak.
- You will first need to run:
docker-compose up -d
- And then edit your
/etc/hoststo havesiwe-oidcpoint to127.0.0.1. This is so both your browser, and Keycloak, can access the IdP. - In Keycloak, you will need to create a new IdP. You can use
http://siwe-oidc:8000/.well-known/openid-configurationto fill the settings automatically. As for the client ID/secret, you can usesdf/sdf.
🌐 Hosted OIDC Provider
Overview
We deployed an OpenID Connect Provider (OP) with SIWE support hosted under oidc.signinwithethereum.org. This deployment is supported by the ENS DAO, under EP-10 in order to have a DAO-governed OpenID Connect Provider.
Developers will be able to use a standard OIDC client to connect to the hosted OP. Please see our OIDF Conformance Test Report for more information about supported OIDC features.
To use the hosted OP, developers are typically interested in the following steps:
- Retrieving the OP configuration.
- Registering the OIDC client with the OP.
- Using the OP configuration to configure the OIDC client.
OpenID Connect Provider Configuration
The OP supports the OpenID Connect Provider Configuration specification as per OpenID Connect Discovery. To fetch the OP configuration which is required for configuring OIDC clients, developers can make a GET HTTPS request to the following endpoint as follows:
curl https://oidc.signinwithethereum.org/.well-known/openid-configuration
This will result in the latest OP configuration object that provides information about supported OIDC flows, endpoints, public keys, signing algorithm, client authentication types, etc. as follows:
{
   "issuer":"https://oidc.signinwithethereum.org/",
   "authorization_endpoint":"https://oidc.signinwithethereum.org/authorize",
   "token_endpoint":"https://oidc.signinwithethereum.org/token",
   "userinfo_endpoint":"https://oidc.signinwithethereum.org/userinfo",
   "jwks_uri":"https://oidc.signinwithethereum.org/jwk",
   "registration_endpoint":"https://oidc.signinwithethereum.org/register",
   "scopes_supported":[
      "openid",
      "profile"
   ],
   "response_types_supported":[
      "code",
      "id_token",
      "token id_token"
   ],
   "subject_types_supported":[
      "pairwise"
   ],
   "id_token_signing_alg_values_supported":[
      "RS256"
   ],
   "userinfo_signing_alg_values_supported":[
      "RS256"
   ],
   "token_endpoint_auth_methods_supported":[
      "client_secret_basic",
      "client_secret_post",
      "private_key_jwt"
   ],
   "claims_supported":[
      "sub",
      "aud",
      "exp",
      "iat",
      "iss",
      "preferred_username",
      "picture"
   ],
   "op_policy_uri":"https://oidc.signinwithethereum.org/legal/privacy-policy.pdf",
   "op_tos_uri":"https://oidc.signinwithethereum.org/legal/terms-of-use.pdf"
}
OpenID Connect Client Registration
To use the hosted OIDC server it is required to register the application as an OIDC client using the OIDC client registration of oidc.signinwithethereum.org. Currently, no user interface for OIDC client registration is supported. For that reason, developers will need to use the REST API.
To register a new OIDC client, the following request has to be adapted:
curl -X POST https://oidc.signinwithethereum.org/register \
   -H 'Content-Type: application/json' \
   -d '{"redirect_uris": ["https://<your.comaind>/cb"]}'
The OIDC server needs to know whether the user is allowed to be redirected to the URI in the OIDC request after authentication for the specific OIDC client. This must be configured through the redirect_uris parameter.
The response will be a OIDC client metadata object that contains the client_id and client_secret that have to be used to retrieve the OIDC tokens from the token endpoint. Developers have to make sure that those parameters have to be kept secret.
The following is an example response:
{
    "client_id": "9b49de48-d198-47e7-afff-7ee26cbcbc95",
    "client_secret": "er...",
    "registration_access_token": "2a...",
    "registration_client_uri": "https://oidc.signinwithethereum.org/client/9b49de48-d198-47e7-afff-7ee26cbcbc95",
    "redirect_uris": ["https://<your.domain>/cb"]
}
A client can then be updated or deleted using the registration_client_uri with the registration_access_token as a Bearer token.
A variety of metadata options are available. In particular, we make use of the following:
client_name;logo_uri; andclient_uri.
📖 SIWE Overview
Sign-In with Ethereum
Today’s login experiences rely on accounts controlled by centralized identity providers, for-profit behemoths like Google, Facebook, and Apple. Identity providers often have sole discretion over the existence and use of users’ digital identities across the web, fundamentally at odds with the best interest of users.
The Ethereum Foundation and Ethereum Name Service (ENS) put forward a Request for Proposal for Sign-in with Ethereum in 2021, which would enable users to use their Ethereum accounts to access web services instead of accounts owned by large corporations.
The Ethereum ecosystem already has tens of millions of monthly active wallet users signing with their cryptographic keys for financial transactions, community governance, and more.
The security of these wallets has been proven across billions of dollars of digital assets at stake–not theoretical security, but real tests in production. These secure wallets can also be used to sign in to Web2 services.
Benefits to Web2 and Web3
Sign-In with Ethereum describes how Ethereum accounts authenticate with off-chain services by signing a standard message format parameterized by scope, session details, and security mechanisms (e.g., a nonce).
Already, many services support workflows to authenticate Ethereum accounts using message signing, such as establishing a cookie-based web session which can manage privileged metadata about the authenticating address.
For Web2, this is an opportunity to give users control over their identifiers and slowly introduce their dedicated user bases to Web3. By providing a strict specification that can be followed along with any necessary tooling to ease any integration concerns, Sign-In with Ethereum has a chance at truly transforming the way in which individuals interact with apps and services.
For Web3, this is an opportunity to standardize the sign-in workflow and improve interoperability across existing services, while also providing wallet vendors a reliable method to identify signing requests as Sign-In with Ethereum requests for improved UX.
📜 EIP-4361
EIP-4361: Sign-In with Ethereum
Abstract
Sign-In with Ethereum describes how Ethereum accounts authenticate with off-chain services by signing a standard message format parameterized by scope, session details, and security mechanisms (e.g., a nonce). The goals of this specification are to provide a self-custodied alternative to centralized identity providers, improve interoperability across off-chain services for Ethereum-based authentication, and provide wallet vendors a consistent machine-readable message format to achieve improved user experiences and consent management.
Motivation
When signing in to popular non-blockchain services today, users will typically use identity providers (IdPs) that are centralized entities with ultimate control over users’ identifiers, for example, large internet companies and email providers. Incentives are often misaligned between these parties. Sign-In with Ethereum offers a new self-custodial option for users who wish to assume more control and responsibility over their own digital identity.
Already, many services support workflows to authenticate Ethereum accounts using message signing, such as to establish a cookie-based web session which can manage privileged metadata about the authenticating address. This is an opportunity to standardize the sign-in workflow and improve interoperability across existing services, while also providing wallet vendors a reliable method to identify signing requests as Sign-In with Ethereum requests for improved UX.
Specification
Sign-In with Ethereum works as follows:
- The wallet presents the user with a structured plaintext message or equivalent interface for signing with the EIP-191 signature scheme (string prefixed with
\x19Ethereum Signed Message:\n<length of message>). ThemessageMUST incorporate an Ethereumaddress,domainrequesting the signing,versionof the message, a chain identifierchain-id,urifor scoping,nonceacceptable to the server, andissued-attimestamp. - The signature is then presented to the server, which checks the signature’s validity and message content.
- Additional fields, including
expiration-time,not-before,request-id,chain-id, andresourcesmay be incorporated as part of authentication for the session. - The server may further fetch data associated with the Ethereum address, such as from the Ethereum blockchain (e.g., ENS, account balances, ERC-20/ERC-721/ERC-1155 asset ownership), or other data sources that may or may not be permissioned.
Example message to be signed
service.org wants you to sign in with your Ethereum account:
0xc02aaa39b223fe8d0a0e5c4f27ead9083c756cc2

I accept the ServiceOrg Terms of Service: https://service.org/tos

URI: https://service.org/login
Version: 1
Chain ID: 1
Nonce: 32891756
Issued At: 2021-09-30T16:25:24Z
Resources:
- ipfs://bafybeiemxf5abjwjbikoz4mc3a3dla6ual3jsgpdr4cjr3oz3evfyavhwq/
- https://example.com/my-web2-claim.json
Informal Message Template
A Bash-like informal template of the full message is presented below for readability and ease of understanding. Field descriptions are provided in the following section. A full ABNF description is provided in the section thereafter.
${domain} wants you to sign in with your Ethereum account:
${address}

${statement}

URI: ${uri}
Version: ${version}
Chain ID: ${chain-id}
Nonce: ${nonce}
Issued At: ${issued-at}
Expiration Time: ${expiration-time}
Not Before: ${not-before}
Request ID: ${request-id}
Resources:
- ${resources[0]}
- ${resources[1]}
...
- ${resources[n]}
Message Field Descriptions
authorityis the RFC 3986authoritythat is requesting the signing.addressis the Ethereum address performing the signing conformant to capitalization encoded checksum specified in EIP-55 where applicable.statement(optional) is a human-readable ASCII assertion that the user will sign, and it must not contain'\n'(the byte0x0a).uriis an RFC 3986 URI referring to the resource that is the subject of the signing (as in the subject of a claim).versionis the current version of themessage, which MUST be1for this specification.chain-idis the EIP-155 Chain ID to which the session is bound, and the network where Contract Accounts must be resolved.nonceis a randomized token used to prevent replay attacks, at least 8 alphanumeric characters.issued-atis the ISO 8601 datetime string of the current time.expiration-time(optional) is the ISO 8601 datetime string that, if present, indicates when the signed authentication message is no longer valid.not-before(optional) is the ISO 8601 datetime string that, if present, indicates when the signed authentication message will become valid.request-id(optional) is an system-specific identifier that may be used to uniquely refer to the sign-in request.resources(optional) is a list of information or references to information the user wishes to have resolved as part of authentication by the relying party. They are expressed as RFC 3986 URIs separated by"\n- ".
ABNF Message Format
The message to be signed MUST conform with the following Augmented Backus-Naur Form (ABNF, RFC 5234) expression (note that %s denotes case sensitivity for a string term, as per RFC 7405).
sign-in-with-ethereum =
    domain %s" wants you to sign in with your Ethereum account:" LF
    address LF
    LF
    [ statement LF ]
    LF
    %s"URI: " uri LF
    %s"Version: " version LF
    %s"Chain ID: " chain-id LF
    %s"Nonce: " nonce LF
    %s"Issued At: " issued-at
    [ LF %s"Expiration Time: " expiration-time ]
    [ LF %s"Not Before: " not-before ]
    [ LF %s"Request ID: " request-id ]
    [ LF %s"Resources:"
    resources ]

domain = authority
    ; From RFC 3986:
    ;     authority     = [ userinfo "@" ] host [ ":" port ]
    ; See RFC 3986 for the fully contextualized
    ; definition of "authority".

address = "0x" 40*40HEXDIG
    ; Must also conform to captilization
    ; checksum encoding specified in EIP-55
    ; where applicable (EOAs).

statement = *( reserved / unreserved / " " )
    ; See RFC 3986 for the definition
    ; of "reserved" and "unreserved".
    ; The purpose is to exclude LF (line break).

uri = URI
    ; See RFC 3986 for the definition of "URI".

version = "1"

chain-id = 1*DIGIT
    ; See EIP-155 for valid CHAIN_IDs.

nonce = 8*( ALPHA / DIGIT )
    ; See RFC 5234 for the definition
    ; of "ALPHA" and "DIGIT".

issued-at = date-time
expiration-time = date-time
not-before = date-time
    ; See RFC 3339 (ISO 8601) for the
    ; definition of "date-time".

request-id = *pchar
    ; See RFC 3986 for the definition of "pchar".

resources = *( LF resource )

resource = "- " URI
Signing and Verifying with Ethereum Accounts
- For Externally Owned Accounts (EOAs), the verification method specified in EIP-191 MUST be used.
- For Contract Accounts,
- The verification method specified in EIP-1271 SHOULD be used, and if it is not, the implementer MUST clearly define the verification method to attain security and interoperability for both wallets and relying parties.
- When performing EIP-1271 signature verification, the contract performing the verification MUST be resolved from the specified
chain-id. - Implementers SHOULD take into consideration that EIP-1271 implementations are not required to be pure functions, and can return different results for the same inputs depending on blockchain state. This can affect the security model and session validation rules. For example, a service with EIP-1271 signing enabled could rely on webhooks to receive notifications when state affecting the results is changed. When it receives a notification, it invalidates any matching sessions.
Resolving Ethereum Name Service (ENS) Data
- The server or wallet MAY additionally perform resolution of ENS data, as this can improve the user experience by displaying a human-friendly information that is related to the
address. Resolvable ENS data include:- The primary ENS name.
- The ENS avatar.
- Any other resolvable resources specified in the documentation.
- If resolution of ENS data is performed, implementers SHOULD take precautions to preserve user privacy and consent, as their
addresscould be forwarded to third party services as part of the resolution process.
Server-Side (Relying Party) Implementer Guidelines
Verifying a signed message
- The message MUST be checked for conformance to the ABNF above, checked against expected term values after parsing, and its signature must be verified.
Creating sessions
- Sessions MUST be bound to the
addressand not to further resolved resources that may change.
Interpreting and resolving resources
- The listed
resourcesmust be RFC 3986 URIs, but their interpretation is out of scope of this specification. - Implementers SHOULD ensure that that URIs are human-friendly when expressed in plaintext form.
Wallet Implementer Guidelines
Verifying message
- The full
messageMUST be checked for conformance to the ABNF above. - Wallet implementers SHOULD warn users if the substring
"wants you to sign in with your Ethereum account"appears anywhere in an EIP-191 message signing request unless the message fully conforms to the format defined in this specification.
Verifying domain binding
- Wallet implementers MUST prevent phishing attacks by matching on the
domainterm when processing a signing request. For example, when processing the message beginning with"service.invalid wants you to sign in...", the wallet checks that the request actually originated fromservice.invalid. - The domain SHOULD be read from a trusted data source such as the browser window or over WalletConnect (EIP-1328) sessions for comparison against the signing message contents.
Creating Sign-In with Ethereum interfaces
- Wallet implementers MUST display to the user the following terms from the Sign-In with Ethereum signing request by default and prior to signing, if they are present:
domain,address,statement, andresources. Other present terms MUST also be made available to the user prior to signing either by default or through an extended interface. - Wallet implementers displaying a plaintext
messageto the user SHOULD require the user to scroll to the bottom of the text area prior to signing. - Wallet implementers MAY construct a custom Sign-In With Ethereum user interface by parsing the ABNF terms into data elements for use in the interface. The display rules above still apply to custom interfaces.
Supporting internationalization (i18n)
- After successfully parsing the message into ABNF terms, translation may happen at the UX level per human language.
Rationale
Requirements
Write a specification for how Sign-In with Ethereum should work. The specification should be simple and generally follow existing practices. Avoid feature bloat, particularly the inclusion of lesser-used projects who see getting into the specification as a means of gaining adoption. The core specification should be decentralized, open, non-proprietary, and have long-term viability. It should have no dependence on a centralized server except for the servers already being run by the application that the user is signing in to. The basic specification should include: Ethereum accounts used for authentication, ENS names for usernames (via reverse resolution), and data from the ENS name’s text records for additional profile information (e.g. avatar, social media handles, etc).
Additional functional requirements:
- The user must be presented a human-understandable interface prior to signing, mostly free of machine-targeted artifacts such as JSON blobs, hex codes (aside from the Ethereum address), and baseXX-encoded strings.
- The application server must be able to implement fully usable support for its end without forcing a change in the wallets.
- There must be a simple and straightforward upgrade path for both applications and wallets already using Ethereum account-based signing for authentication.
- There must be facilities and guidelines for adequate mitigation of Man-in-the-Middle (MITM) attacks, replay attacks, and malicious signing requests.
Design Goals
- Human-Friendly
- Simple to Implement
- Secure
- Machine Readable
- Extensible
Technical Decisions
Why EIP-191 (Signed Data Standard) over EIP-712 (Ethereum typed structured data hashing and signing)
- EIP-191 is already broadly supported across wallets UX, while EIP-712 support for friendly user display is pending. (1, 2, 3, 4)
- EIP-191 is simple to implement using a pre-set prefix prior to signing, while EIP-712 is more complex to implement requiring the further implementations of a bespoke Solidity-inspired type system, RLP-based encoding format, and custom keccak-based hashing scheme. (2)
- EIP-191 produces more human-readable messages, while EIP-712 creates signing outputs for machine consumption, with most wallets not displaying the payload to be signed in a manner friendly to humans. (1)
- EIP-712 has the advantage of on-chain representation and on-chain verifiability, such as for their use in metatransactions, but this feature is not relevant for the specification’s scope. (2)
- Why not use JWTs? Wallets don’t support JWTs. The keccak hash function is not assigned by IANA for use as a JOSE algorithm. (2, 3)
- Why not use YAML or YAML with exceptions? YAML is loose compared to ABNF, which can readily express character set limiting, required ordering, and strict whitespacing. (2, 3)
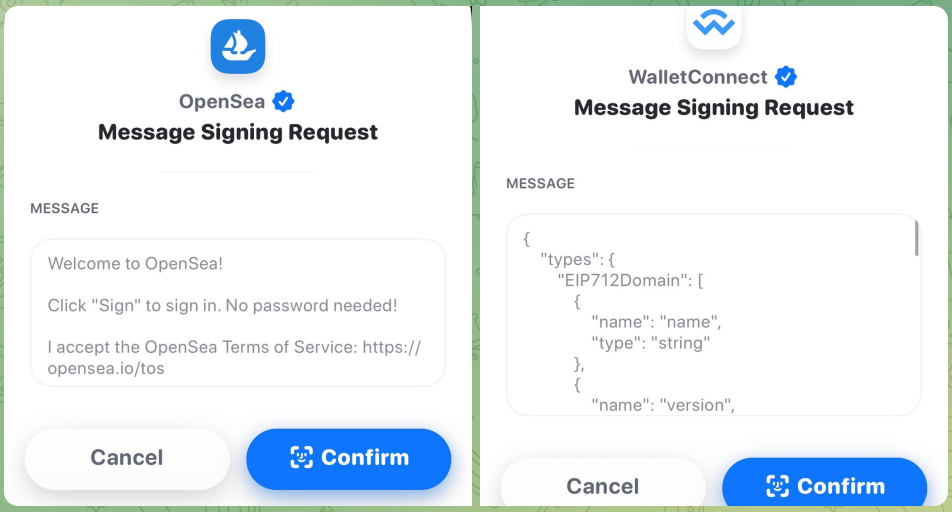
Out of Scope
The following concerns are out of scope for this version of the specification to define:
- Additional authentication not based on Ethereum addresses.
- Authorization to server resources.
- Interpretation of the URIs in the
resourcesterm as claims or other resources. - The specific mechanisms to ensure domain-binding.
- The specific mechanisms to generate nonces and evaluation of their appropriateness.
- Protocols for use without TLS connections.
Considerations for Forwards Compatibility
The following items are considered for future support in either through an iteration of this specification or new work items using this specification as a dependency.
- Possible support for Decentralized Identifiers and Verifiable Credentials.
- Possible cross-chain support.
- Possible SIOPv2 support.
- Possible future support for EIP-712.
- Version interpretation rules, e.g., sign with minor revision greater than understood, but not greater major version.
Backwards Compatibility
- Most wallet implementations already support EIP-191, so this is used as a base pattern with additional features.
- Requirements were gathered from existing implementations of similar sign-in workflows, including statements to allow the user to accept a Terms of Service, nonces for replay protection, and inclusion of the Ethereum address itself in the message.
Reference Implementation
A reference implementation is available here.
Security Considerations
Identifier reuse
- Towards perfect privacy, it would be ideal to use a new uncorrelated identifier (e.g., Ethereum address) per digital interaction, selectively disclosing the information required and no more.
- This concern is less relevant to certain user demographics who are likely to be early adopters of this specification, such as those who manage an Ethereum address and/or ENS names intentionally associated with their public presence. These users often prefer identifier reuse to maintain a single correlated identity across many services.
- This consideration will become increasingly important with mainstream adoption. There are several ways to move towards this model, such as using HD wallets, signed delegations, and zero-knowledge proofs. However, these approaches are out of scope for this specification and better suited for follow-on specifications.
Key management
- Sign-In with Ethereum gives users control through their keys. This is additional responsibility that mainstream users may not be accustomed to accepting, and key management is a hard problem especially for individuals. For example, there is no “forgot password” button as centralized identity providers commonly implement.
- Early adopters of this specification are likely to be already adept at key management, so this consideration becomes more relevant with mainstream adoption.
- Certain wallets can use smart contracts and multisigs to provide an enhanced user experiences with respect to key usage and key recovery, and these can be supported via EIP-1271 signing.
Wallet and server combined security
- Both the wallet and server must implement this specification for improved security to the end user. Specifically, the wallet MUST confirm that the message is for the correct
domainor provide the user means to do so manually (such as instructions to visually confirming the correct domain in a TLS-protected website prior to connecting via QR code or deeplink), otherwise the user is subject to phishing attacks.
Minimizing wallet and server interaction
- In some implementions of wallet sign-in workflows, the server first sends parameters of the
messageto the wallet. Others generate the message for signing entirely in the client side (e.g., dapps). The latter approach without initial server interaction SHOULD be preferred when there is a user privacy advantage by minimizing wallet-server interaction. Often, the backend server first produces anonceto prevent replay attacks, which it verifies after signing. Privacy-preserving alternatives are suggested in the next section on preventing replay attacks. - Before the wallet presents the message signing request to the user, it MAY consult the server for the proper contents of the message to be signed, such as an acceptable
nonceor requested set ofresources. When communicating to the server, the wallet SHOULD take precautions to protect user privacy by mitigating user information revealed as much as possible. - Prior to signing, the wallet MAY consult the user for preferences, such as the selection of one
addressout of many, or a preferred ENS name out of many.
Preventing replay attacks
- A
nonceshould be selected per session initiation with enough entropy to prevent replay attacks, a man-in-the-middle attack in which an attacker is able to capture the user’s signature and resend it to establish a new session for themselves. - Implementers MAY consider using privacy-preserving yet widely-available
noncevalues, such as one derived from a recent Ethereum block hash or a recent Unix timestamp.
Verification of domain binding
- Wallets MUST check that the
domainmatches the the actual signing request source. - This value SHOULD be checked against a trusted data source such as the browser window or over another protocol.
Channel security
- For web-based applications, all communications SHOULD use HTTPS to prevent man-in-the-middle attacks on the message signing.
- When using protocols other than HTTPS, all communications SHOULD be protected with proper techniques to maintain confidentiality, data integrity, and sender/receiver authenticity.
Session invalidation
There are several cases where an implementer SHOULD check for state changes as they relate to sessions.
- If an EIP-1271 implementation or dependent data changes the signature computation, the server SHOULD invalidate sessions appropriately.
- If any resources specified in
resourceschange, the server SHOULD invalidate sessions appropriately. However, the interpretation ofresourcesis out of scope of this specification.
Maximum lengths for ABNF terms
- While this specification does not contain normative requirements around maximum string lengths, implementers SHOULD choose maximum lengths for terms that strike a balance across the prevention of denial of service attacks, support for arbitrary use cases, and user readability.
Copyright Waiver
Copyright and related rights waived via CC0.
🔍 Review of Related EIPs
Rationale
Ethereum Improvement Proposals, or EIPs, are “standards specifying potential new features or processes for Ethereum” that include specifications for developers, and start typically with drafts that encourage a feedback cycle for the greater community. Part of the research in creating EIP-4361 necessitated an investigation into previous EIPs that sought to standardize the way decentralized identity is managed using Ethereum, as well as different ways of signing data.
Existing EIP Overview
EIP-191
- EIP-191 is a specification about how to handle signed data in Ethereum contracts. It produces human-readable messages and is simple to implement by prefixing a custom message with an invariable prefix prior to presenting it to wallet users for interactive signing.
- Originally, EIP-191 was a response to prevent pre-signed transactions originating from multisig wallets from being reused by multisig wallets with the same members.
- It consists of the following format for
signed_data: 0x19 <1 byte version> <version specific data> <data to sign>- In practice, it is prefixed with:
"\x19Ethereum Signed Message:\n" + len(message). - Additionally,
signed_datacould never be an Ethereum transaction, because it cannot be one RLP-structure, but a 1-byte RLP payload followed by something else.
EIP-712
- EIP-712 is a standard for the hashing and signing of typed structured data as opposed to just bytestrings. At the core of EIP-712 is the need to sign more complex messages in order to have safer and deeper interactions with decentralized applications.
- Another goal for EIP-712 was to improve the usability of off-chain message signing for use on-chain in order to save gas and reduce the number of on-chain transactions.
EIP-725
- EIP-725 is an identity standard proposed in order to describe proxy smart contracts that can be controlled by multiple keys and other contracts. An associated EIP (735) enables the addition and removal of claims to an ERC-725 smart contract.
- EIP-725 was an early attempt at enabling self-sovereign identity on Ethereum, which involved the deployment of a smart contract that enabled the association of multiple keys with an identity, included
executeandapprovemethods that allowed it to be used as a proxy, and attempted to forge the building blocks for access control lists through those contracts.
EIP-735
- EIP-735 is a standard for a claim holder interface to allow dapps and smart contracts to check claims about a claim holder (EIP-725). Claims must first be requested and issued by an issuer that signs a message containing the identity’s address, the claim topic, and additional data. The data is then stored on-chain in the identity owner’s smart contract.
EIP-780
- EIP-780 defines an Ethereum Claims Registry to support decentralized identity on Ethereum and provides a central point of reference for on-chain claims. The Ethereum Claims Registry is a smart contract that can be commonly used by any account and provides an interface for adding, receiving, and removing claims. In this scenario, claims are issued from an issuer to a subject with a key.
- Additionally, off-chain claims can be made when an issuer signs data, encodes it into a JWT, and the JWT can later be verified. These off-chain claims can eventually be anchored on-chain via a form of ‘badges’ system which differs from using traditional NFTs because they are non-transferable.
EIP-1056
- EIP-1056 is a specification for an identity system for Ethereum compliant with the decentralized identifiers standard (DID). It is meant to be paired with EIP-780, which defines an Ethereum Claims Registry to be used for the issuance and verification of claims.
- EIP-1056 defines all existing Ethereum accounts as valid identities based solely on their existence as a public / private keypair. All identities can assign delegates that are valid for a specified amount of time and can be revocable or not. Additionally, delegates can be used on or off-chain to sign JWTs, Ethereum transactions, and arbitrary data.
- This EIP was a response to EIP-725, due to EIP-725 requiring the creation of a smart contract and not being free for the end-user. The specification additionally accounts for key rotation without changing the primary identifier of the identity.
EIP-1102
- EIP-1102 proposes a more consentful and privacy-preserving way to expose metadata from an Ethereum user’s wallet by prompting the user to accept the egressing data prior to its release. This strategy has already been implemented by MetaMask for user wallet connections.
EIP-1115
- EIP-1115 defines an authentication mechanism for dapps to authenticate users. In the specification, an HTTP server is set up by a user (called a DAuth server) and requires a password and public / private keypair. The user then registers a username on the smart contract that the specification defines by including the public key of the DAuth server and an address.
- Logging into a dapp includes the user providing a random string (“Code”) to identify the current authentication session, a HashCode, and the username from the smart contract. The dapp will fetch both the public key and server address from the smart contract, and generate a secret string. After that, it will pass the “Code,” HashCode, username, and secret string to the DAuth server’s verification endpoint.
- The DAuth server will fetch the hash of the password and private key from its database related to the username in the request. After validating the HashCode, and attempting to decrypt the cipher, the decrypted value will then be sent to the dapp.
EIP-1271
- EIP-1271 is a specification that demonstrates a way for contracts to verify if a provided signature is valid when an account in question is a smart contract. This could be in the case of a user using a smart contract-based wallet or a user being part of a multisig wallet.
- Smart contracts cannot directly sign messages, so EIP-1271 serves as a guide to implement
isValidSignature(hash, signature)on the signing contract that can be called to validate a signature. With the rise of smart contract wallets and DAOs controlled by multi-sigs, these parties require the means to use signed messages to demonstrate the right to move assets, vote, or for other purposes.
EIP-1484
- EIP-1484 provides a different attempt at creating a digital identity standard on Ethereum by proposing an identity management and aggregation framework. Entities in this specification can claim an identity via a singular identity registry smart contract. The goal of this additional specification was to keep it compliant with the EIP-725 and EIP-1056 specifications that already existed.
- EIP-1484’s aim was to create a protocol layer between the Ethereum blockchain and individual applications that required some form of user identity (tackling identity management and interoperability challenges along the way). This implementation required a global ERC1848 implementation up and running on the network in order to handle and enforce the rules for a global namespace made up of “EINs” or Ethereum Identification Numbers.
EIP-1812
- EIP-1812 defines a method for off-chain verifiable claims built on EIP-712, which can be verified on-chain by smart contracts, state channel implementations, or off-chain libraries. By using ERC-735 and ERC-780 individuals can make claims that live on-chain, but sensitive information is best kept off-chain for GDPR and PII protection purposes.
- Additionally, this EIP also recognizes EIP-1056 to provide a method for addresses to assign delete signers so an account can perform an action on behalf of a smart contract. Based on this specification, EIP-712 based state channels can include embeddable claims which are useful for exchanging private claims between parties for regulatory reasons and avoiding posting them on-chain.
EIP-2525
- EIP-2525 presented a new method of login to the Ethereum blockchain using metadata stored in ENS. EIP-2525’s workflow would include an ENS domain retrieval from the user, domain resolution, interpretation of a text entry, an evaluation of the content in the text entry, and lastly, the corresponding object would then be returned to the dapp.
- At its core, EIP-2525 seeks to use ENS metadata to standardize across login mechanisms.
EIP-2844
- EIP-2844 makes JOSE-conformant DID resolution and verificationMethod requests part of ETH RPC (EIP-1474) and standardizes how Ethereum wallets can be queried for DID documents.
EIP-3361
- EIP-3361 introduces a standard for JSON-RPC calls across wallets and provides an upgrade path for all of today’s signing methods that are currently splintered. It mentions EIP-1474,
eth_signstandardization with prefixed signatures, as where signing became fragmented due to some applications using it and some choosing to keep the oldereth_signbehavior pre-EIP-1474. - It seeks to depreciate
personal_signin order to make sure both old and new applications are using the same method.
📜 SIWE Code of Conduct
A code of conduct for public community activity around Sign-In with Ethereum.
The following outlines a code of conduct for the public community-facing interactions around the Sign-In with Ethereum project, including community calls hosted by Spruce, and the public Discord channel.
Rationale
Our goal is to create the best environment for the Sign-In with Ethereum standard to flourish across Web2 and Web3. To achieve this, we must have the best technologists, strategists, and community leaders actively involved, building and maintaining an environment of trust which can only exist where each individual is able to enjoy respect and courtesy.
To ensure a common understanding of “showing respect and courtesy to each other,” we have adopted the following code of conduct.
Unacceptable Behavior
The following types of abusive behavior are unacceptable and constitute code of conduct violations:
- Harassment - including offensive verbal comments related to gender, sexual orientation, disability, physical appearance, body size, race, or religion, and unwelcome sexual or romantic attention.
- Threats - threatening someone verbally or in writing.
- Maliciousness - any direct abuse towards other members of the community — deliberately attempting to make others feel bad, name-calling, singling out others for derision or exclusion. For example, telling someone they don’t belong at community calls or in the public discussion.
Enforcement
If abusive behavior is witnessed or reported either on the community calls or in the public Discord channel, it will first be evaluated by a member of the Spruce team. If it is deemed inappropriate and in violation of the code of conduct, it will result in a permanent suspension from both the community calls and Discord channel.
Reporting
All individuals reporting violations of the code of conduct made by other community members will remain anonymous.
License and Notes
The Sign-In with Ethereum code of conduct is available under the terms of the CC0 license.
This code of conduct draws from and was heavily inspired by the Recurse Center Code of Conduct. We hope to create a welcoming space for anyone wishing to participate in helping shape Sign-In with Ethereum.